Adding, Saving, and Deleting Markers
How you add markers depends on your workflow. You can add a marker to a clip, subclip, or sequence. You can add markers while video plays or you can scrub through the video and add markers at appropriate locations. You can control the video, add markers, and delete markers by using the mouse or shortcut keys.
n You can add a marker to a sequence’s final frame, but not the sequence tail frame. For more information about these two frames, see Position Indicator Placement After an Insert or Overwrite Edit.
Adding text in the Comment column is optional. You can add marker text immediately, or you can add a marker without text and then add text later.
You can select which color you want to use for the marker icon. This can be useful if you want to establish particular meanings for particular colors — for example, red for restrictions or blue for audio. For each color, a separate Create Marker button is shown on the toolbar.

n You cannot add, edit or delete markers on the All markers layer.
To add a marker:
-
Click the layer selector and select the track to which you want to add the marker.
-
In the Media Viewer, navigate to the position where you want to add a marker.
-
Do one of the following:
-
In the Storyboard tab, click the Create Marker button.
-
(List view only) Press Ctrl+M. By default, a marker with a red icon is created.
-
(List view only) Press Ctrl plus a key on the numeric keypad that is associated with the color you want to use for the marker icon:
-
Ctrl+0 to use the last color picked. If no color was selected in a session, the color is white.
-
Ctrl+1: Red
-
Ctrl+2: Green
-
Ctrl+3: Blue
-
Ctrl+4: Cyan
-
Ctrl+5: Magenta
-
Ctrl+6: Yellow
-
Ctrl+7: Black
-
Ctrl+8: White
-
Starting with version 2021.11, the Storyboard shortcuts for marker creation also work when the Browse or Search app is in focus; starting with version 2022.12, they also work when the Media Viewer is in focus. This allows you to use the keyboard shortcuts to create markers without the Storyboard view being in focus.
After you create a new marker, the focus is in the Comment column. The cursor appears in the Comment field and you can begin typing.
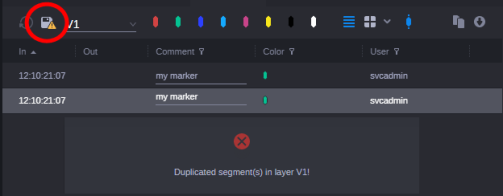
If you create a duplicate marker (a marker that shares the same timecode, color and comment with another marker), a message appears and an “Unsaved changes” icon is shown on the toolbar. Change the duplicate marker color or comment, or delete the duplicate marker.

-
To add or edit marker text:
-
Select a marker and press Enter.
-
(List view only) Slowly double-click the Comment field.
The cursor is positioned in the Comment field. If the field already contains text, the cursor is position at the end of the marker text.
To save marker text:
-
Click outside the Comment field.
To delete markers (List view only):
-
Do one of the following:
-
Select the marker.
-
Press Shift+click to select a range of markers.
-
Press Ctrl+click to multi-select individual markers.
-
-
Do one of the following:
-
Right-click the selection and select Delete.
-
Press the Delete key.
-
To change the color of a marker icon (List view only):
-
Slowly double-click the Color field for the marker whose color you want to change.
-
In the palette tool that opens, select the color you want to use.

To change the color of several marker icons at the same time (List view only):
-
Do one of the following:
-
Press Shift+click to select a range of markers.
-
Press Ctrl+click to multi-select individual markers.
-
-
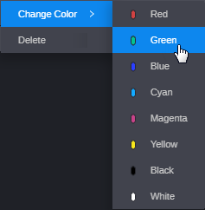
Right-click the selection and select Change Color.
-
In the fly-out menu that opens, select the color you want to use for all selected marker icons.
