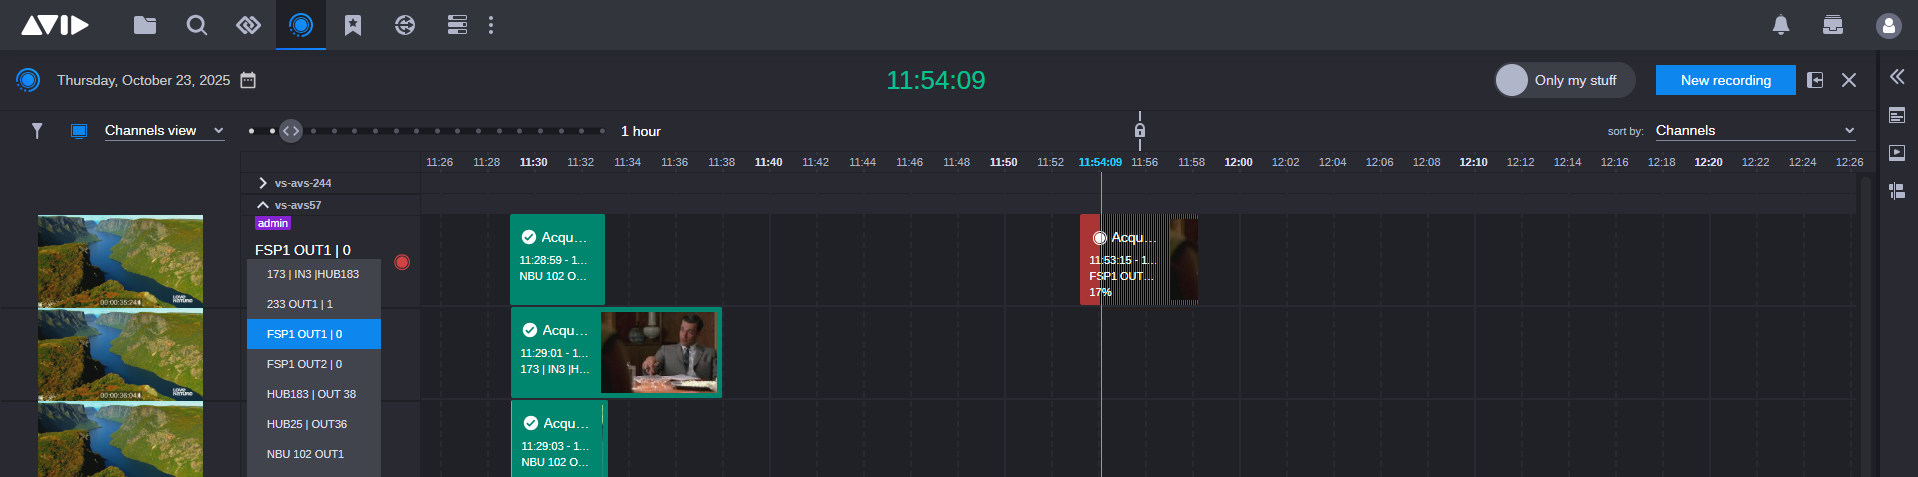
Channels View
The Channels View is a visual display of the channels and recording cards by date and time.

For more information, see Scheduling New Recordings.
Segmented Recordings
The Acquire app allows recordings to be segmented at a user defined interval (minimum being 5 minutes). For instance, a 24-hour recording can be segmented into 24 one-hour segments, which are easier to work with than having one very large recording.
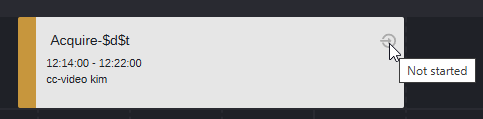
Segmented recordings in the Channels View graphically show the progress of the recording. The segmented recording displays dotted lines showing where the segments are located in the recording. The Channels View shows the status of the recording by changing the color of the segment to red as it records. When the recording of a segment completes, the color changes to green.
The "Only my stuff" Toggle Switch
The "Only my stuff" button acts as a filter that allows you to limit the Channels View to highlight only those recordings that you own. When you click this button, it turns blue to let you know that the recordings filter is active.

Timeline Interaction Enhancements
The Channels View now includes several new features that improve how users interact with the timeline and manage channel visibility.

Advanced Filtering
Two filtering modes are now available:
-
Channel Filtering
Filters the timeline to show only selected channels. This is useful when working with a subset of sources or when focusing on specific ingest paths. The filtering window includes the following options:
-
All Available: Displays all currently available channels.
-
No Scheduled Recording: Filters channels that do not have any scheduled recordings within a user-defined time window.
-
Custom Availability: Filters channels based on a selected availability range. The dropdown menu includes options such as Today, This Week, Next Week, This Month or custom date ranges.
-
-
Recording Filtering
Filters recordings based on their status (e.g., scheduled, in progress, completed). This allows users to quickly locate active or pending recordings across all channels. The filtering window displays the following categories:
-
In Progress: Recordings currently active.
-
Planned: Scheduled recordings that have not yet started.
-
Completed: Recordings that have finished successfully.
-
Error: Recordings that encountered issues during execution.
-
Each category shows the number of matching recordings, allowing users to quickly assess system activity and identify problem areas.
Filters are applied in real time and can be combined to narrow the timeline view to specific channels and recording states. The number of active filters is shown at the top of the filtering window (e.g., “Applied Filters: 1”), and users can clear (using the X button) or adjust filters as needed.
Enhanced Sorting
The Channels View includes a dynamic sorting system that allows users to organize the timeline based on operational relevance.

The sorting dropdown is located above the timeline and includes the following options:
-
Channels
Sorts the timeline by channel name.
-
Empty Channels
Prioritizes channels that currently have no scheduled or active recordings. This helps users identify available channels when planning new recordings.
-
Active Recordings
Displays channels with ongoing recordings at the top of the timeline. This view is ideal for monitoring live ingest activity.
-
Upcoming Recordings
Sorts channels based on scheduled recordings that have not yet started. Channels with the nearest upcoming recordings appear first.
Sorting is applied immediately and updates the timeline layout without requiring a page refresh. Users can change sorting criteria at any time, and the selected option remains active until manually changed.
Channel Visibility Toggle
The Channels View also includes per-channel visibility controls that allow users to customize the timeline display based on operational needs.

Each device shown in the left-hand panel has an expand/collapse arrow. Click this arrow to show or hide the channel’s timeline data. When hidden, the channel is removed from the timeline view but is still available for scheduling and monitoring.
This feature is especially useful when working with a large number of ingest sources. Users can temporarily hide inactive or irrelevant channels to reduce visual clutter and focus on active workflows.
Time Slot Unselection
Previously, once a time slot was selected, it remained active until another was chosen. This behavior has been updated:
-
Users can now unselect a time slot.
-
This improves usability when no selection is needed and prevents accidental scheduling.
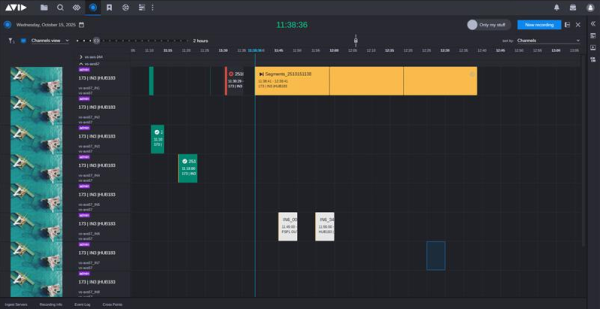
Check-In Icon Redesign
The check-in icon system has been updated to provide clearer visual feedback:
|
Icon |
Status |
|---|---|
|
Gray |
Check-in not done
|
|
White |
Initial check-in done; recording in progress
|
|
None |
Final check-in done.
|

Acquire Recording Manipulations
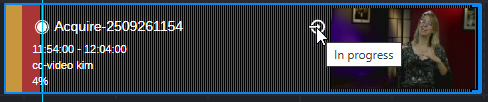
The Acquire app allows you to easily modify recordings directly from the Channels View, enabling quick adjustments without needing to open the Recording Editor. Simply select a recording on the timeline and hover over it to reveal handles at both ends. Drag these handles to adjust the duration and change the start or end times for both current and future recordings.
If you need to reposition a future recording, just drag and drop the recording to its desired location on the timeline.
To resize a recording:
-
Select the recording you want to resize in the Channels View.
-
Hover your mouse over the recording until handles appear at both ends.
-
Click and hold one of the handles. Then, drag it left or right to adjust the recording's duration.
-
Release the mouse button to save the changes.
To start a future recording:
-
In the Channels View, locate the future recording you want to modify.
-
Click and drag the left handle of the recording toward the current time (indicated by the blue bar).
The handle will snap to the current time when you reach it.
-
A confirmation dialog appears with the message: "Start time has been moved to the current time. The recording will start now."
-
Choose "Yes" to immediately begin recording.
-
Choose "No" to cancel the adjustment and revert the start time to its original position.
-
To shorten an ongoing recording:
-
In the Channels View, locate the ongoing recording you want to modify.
-
Click and drag the right handle of the recording to toward the current time (marked by the blue bar).
The handle will automatically snap to the current time when you reach it.
-
A confirmation dialog appears with the following message: "End time has been moved to the current time. The recording will stop now."
-
Choose "Yes" to immediately stop the recording.
-
Choose "No" to cancel the adjustment and revert the end time to its original position.
-
To move a recording:
-
In the Channels View, locate the future recording you want to modify.
-
Drag the recording to its desired location on the timeline.
-
Release the mouse button to confirm the new position.

To move a recording to the current time:
-
In the Channels View, locate the future recording you want to modify.
-
Drag the recording to the current time (marked by the blue bar), and the handle will automatically snap to the current time.
-
A confirmation dialog box appears: " Start time has been moved to the current time. The recording will start now."
-
Choose "Yes" to immediately start the recording.
-
Choose "No" to cancel the adjustment and revert the recording to its original position.
-
Detecting Collisions with Recordings
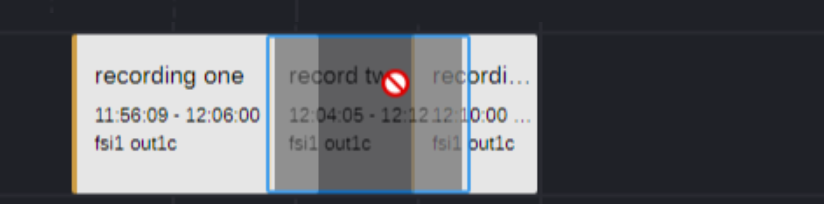
As you drag a recording, it will automatically stop when it reaches another recording to prevent overlaps. Releasing the drag will adjust the start or end time of the moved recording to the next available slot, taking pre-roll times of adjacent recordings into account. If you drag the recording past the midpoint of another, and there is sufficient space on the other side, it will jump over and settle into its previous slot.
Grid Scrolling and Resizing Limits
The following grid scrolling and resizing limits apply:
-
Auto scroll: As you drag the handle near the edge of the timeline, the view will automatically scroll to keep the handle within the visible area. This mimics mouse scrolling.
-
Editing zone: Dragging the handle beyond the grid boundaries will result in a red border and a "not allowed" cursor. This indicates, that you cannot resize the recording outside the designated timeline grid.
-
Unsaved changes: Releasing the mouse button while the handle is red will cancel the resizing and revert the recording to its original duration.
-
Minimum and maximum duration: Resizing a recording is limited by the settings of minimum and maximum allowed recording duration.
-
Overlapping recordings: It is not possible to resize over the next or previous recording.
-
Snapping to grid: For precise edits, drag near the gridlines on the timeline, and the handle will snap to the grid.
Changing Source During Recording
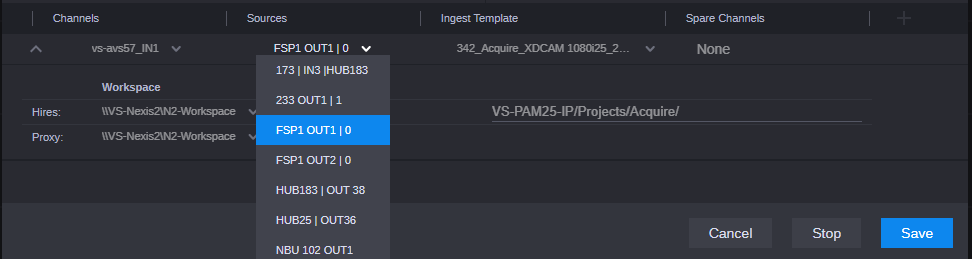
During an active recording, the source can be changed directly within the Channels View. In the Channels section, a drop-down menu appears next to the source name for any channel currently recording. Select a different source from this list to switch inputs in real time.
Alternatively, right-click the ongoing recording and select Edit. In the Recording Details | Edit dialog, use the Sources drop-down to choose a new source, then click Save to apply the change.
Note:
-
When using MediaCentral Stream, Avid Stream IO or NDI sources, switching to a non-functional source (e.g., no signal) will result in a shortened final recording. The duration is reduced by the time the invalid source was selected.
-
For SDI (FastServe Ingest) sources, the recording duration remains unchanged. A black filler is inserted for the period when the source was unavailable.