Maintaining Reserved Asset Management Assets and Shotlists
Starting with version 2020.9, assets and shotlists can be temporarily “reserved.” A reserved asset or shotlist cannot be deleted nor can its essences or locations be deleted. Deletion protection is triggered when a user creates or updates an Asset Management shotlists (EDL): For the shotlist and all its clips reservation properties (a RESERVED flag and RESERVATION date) are set. The reservation properties expire after a configured time span (default: 24 hours) and are automatically removed.
In general, assets can be deleted if the RESERVED flag is not set. If the RESERVED flag is set, any deletion request will be rejected.
As an administrator, you can maintain reserved assets and reserve assets manually in MediaCentral Cloud UX.
-
You can remove the reservation information from assets and shotlists by triggering a Clear Reservation process from the Browse or Search app.
-
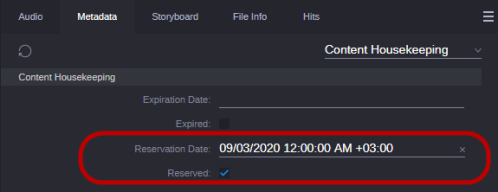
You can modify the Reservation Date and Reserved properties for individual assets and shotlists in the Asset Editor’s Metadata tab. In doing so, you can modify the reservation properties of reserved assets but also set the properties for assets that are not reserved yet.
Removing the Reservation Properties by Using a Process
As an administrator, you can overrule the automatic deletion protection of reserved assets in MediaCentral Cloud UX. If you want to remove the reservation information from an asset or shotlist, you can trigger a Clear Reservation process. This process does the following:
-
It removes the “reserved” flag from the asset (sets the value of the Reserved property to “false”).
-
It clears the reservation date (deletes the value of the Reservation Date property).
The most efficient way is to search for assets using the Reserved property in the Search app, as described in the following procedure.
To clear the reservation properties:
-
Sign in to MediaCentral Cloud UX as an administrator.
-
Open the Search app.
-
Click the arrow of the Search pill and select More.
-
Do the following:
-
Click in the Filter field and type reserved.
-
Scroll down in the menu and select the Reserved property.
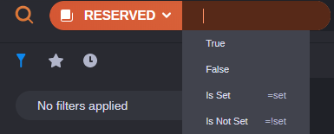
Reserved is set in the Search pill and a list of supported qualifiers opens.

-
-
Select True to search for assets for which the Reserved flag is set.

The system clears any existing search results from the results list and returns assets that match the criteria in the search results list.
-
(Optional) To apply an asset type-based filter, select the asset type asset.video or sequence.edl in the Filters sidebar.
-
Select the assets in the search results list.
-
Do one of the following:
-
Right-click and select Actions > Modify Multiple Assets > Clear Reservation.
-
Click the App Menu and select Actions > Modify Multiple Assets > Clear Reservation.
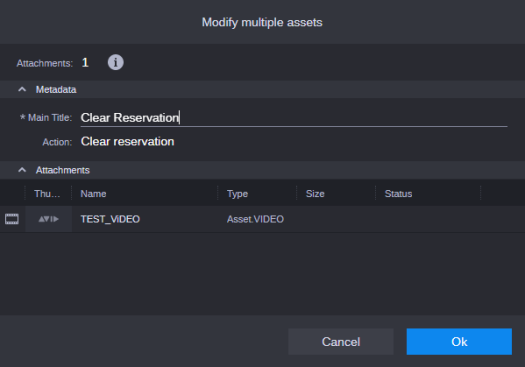
The Modify Multiple Assets process dialog box opens and shows the assets from which the reservation information is to be removed as attachments.

-
-
Provide a main title for the process.
-
Click OK.
The Modify Multiple Assets process dialog box is closed and the clearing process is triggered.
-
(Optional) Open the Process app and monitor the progress of the process Modify Multiple Assets.
Modifying the Reservation Properties Manually
As an administrator, you can manually set and modify reservation information for assets in MediaCentral Cloud UX: You can set and change the Reservation Date and Reserved properties for individual assets and shotlists in the Asset Editor’s Metadata tab. In doing so, you can modify or remove the deletion protection of reserved assets but also set the properties for assets that are not reserved yet.
To change the reservation properties for an individual asset:
-
Sign in to MediaCentral Cloud UX as an administrator.
-
Do one of the following:
-
In the Browse app, open the folders containing the asset you want to edit and double-click the asset.
-
In the Search app, search for the asset you want to edit and double-click the asset in the results list.
The asset opens in the Asset Editor.
-
-
Click the Asset Editor’s Metadata tab.
-
(Optional) To hide the Media Viewer and show only the Metadata tab, click the Media Viewer button in the Asset Editor’s header.
-
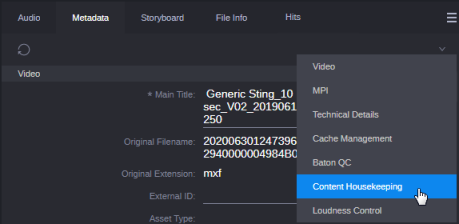
(Optional) Select Content Housekeeping from the Select View menu.

The Metadata tab scrolls down to the Content Housekeeping group.

-
Go to the Reserved property and change the status of the check box.
-
Go to the Reservation Date property and select a date from the calendar picker.
-
Click Save.
Monitoring Clear Reservation Processes
Use the MediaCentral Cloud UX Process app to monitor processes that are triggered by the Clear reservation features. The Process app lets you monitor the Clear Reservation processes that you created in MediaCentral Cloud UX and the processes triggered by the ClearReservations scheduled tasks in the backend.
To monitor processes in the Process app:
-
Sign in to MediaCentral Cloud UX as an administrator.
-
Open the Process app.
-
Click the Display Group Button so it turns blue to group the processes by the process group properties in the Process List.
-
Define filter criteria.
-
Open the Filter sidebar.
-
Expand the Groups list in the Filters sidebar.
-
Select Modify Multiple Assets in the Groups list.
The Process app shows you the corresponding processes.
-
-
(Optional) Apply additional filter criteria in the Filter sidebar.
-
To filter the processes by creation time ranges, expand the Created list and select one of the time ranges.
-
To show only processes of a specific life cycle, expand the Status list and select the Life cycle status you want to show.,
The Process app shows you the processes that match the defined filter criteria.
The Process List updates automatically upon process changes matching the filter criteria.
-
-
(Optional) While you monitor the displayed processes, click the Refresh button to reload processes in the Process List manually.