Creating a Transcript from the Browse and Search App
In addition to the Transcript tab, MediaCentral Cloud UX provides the option to trigger transcript creation in the Browse and Search app. In these cases, you do not need to open the asset in the Transcript tab to create the transcript. The Create Transcript option is only shown in the Browse and Search apps in the following cases:
-
If a single master clip or subclip of an Avid Production Management/local Production Management module is selected.
Multi-selection is not supported.
c Triggering transcript creation from a subclip will transcribe the whole master clip. If the master clip already has a transcript, a re-transcribe action for the master clip is triggered.
-
For users of a group that has the entitlement Avid AI Transcribe RW Access assigned.
-
When the feature pack STT is installed and the required license is activated.
To create a transcript for a master clip or subclip open in the Browse or Search app:
-
Do one of the following:
-
In the Browse app, open a folder of an Avid Production Management/local Production Management module that contains master clips or subclips or both.
-
In the Search app, conduct a search for a master clip or subclip from an Avid Production Management/local Production Management module.
-
-
Do one of the following:
-
Select a master clip or subclip, then click the App Menu and select the Create Transcript menu option.
-
Right-click a master clip or subclip and select Create Transcript from the context menu.
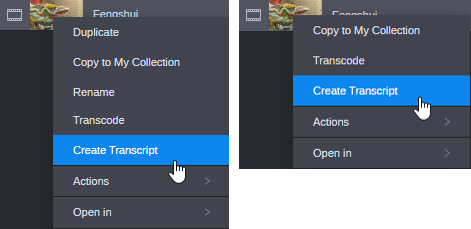
The context menu for a master clip in the Browse app (left) and Search app (right)
The Create Transcript dialog box opens. For a subclip, the dialog box shows the warning that the whole master clip will be transcribed, not only the subclip.
-
-
(optional) Enter a name for the transcript to be created in the Transcript Name field.
If you do not enter a name, the audio track name is used as transcript name.
-
Select the track(s) for which a transcript is to be generated from the Audio Track list.
The Audio Track list shows the audio tracks of the asset.
n If you select more than one audio track, the tracks will be mixed down into one track and a transcript for the mixed down audio track is created. For example, if you select A1 and A2, a mixed down transcript for A1-A2 is created. If you want to create separate transcripts for A1 and A2, first create the transcript for A1, then for A2.
-
Click the Transcribe button.
The dialog box is closed and the transcript creation job is triggered.
If a selected audio track has already a completed transcript or a transcript currently being created, a Re-transcribe dialog box opens; for a track with failed transcript, the dialog box is not shown, re-transcription is started directly. The Re-transcribe dialog box shows one of the following messages:
-
"The transcript for this channel(s) is already completed, would you like to re-transcribe?"
-
"The transcript for this channel(s) is in progress, would you like to re-transcribe?"

Do one of the following:
-
Click Cancel to keep the already existing transcript/to continue with the already running transcript creation.
-
Click Re-transcribe to discard the already existing transcript/to stop the currently running transcript creation, and initiate the re-creation of the transcript.
c All edits previously made to the existing transcript are overwritten.
-
-
(optional) Open the Process app and monitor the transcript creation job. See Monitoring Transcribe and Translate Jobs in the Process App.
-
(optional) Open the Transcript tab and wait until the transcript is shown.
-
For non-growing clips that are shorter than 1 hour, the fully created transcript is shown. Once the transcribe job has completed, the Transcript tab display auto-refreshes and all transcript segments are automatically shown.
If the transcribe job fails before completion, the Transcription in progress message will be replaced by the Transcription failed message.
-
When a transcript is created for a growing (EWC) clip or a non-growing clip that is longer than 1 hour, the Transcript tab display auto-refreshes, new portions of the transcript are automatically shown. As long as the transcript creation is not finished, the shown transcript segments are in read-only mode. When the transcript creation is finished, the Transcript tab auto-refreshes and enables editing of the transcript.
If the transcribe job fails before completion, a message "The transcript creation failed" is shown for a short period of time on the Fast bar, and a warning icon is displayed between the transcript selector and Find control on the toolbar. Its tool-tip reads "Transcription error: partial transcript only". Already displayed portions of the transcript are kept and can be edited.
-