Working with Multiple Sequence Tracks
This section includes additional controls that are available when working with Sequences:
n Although both Sequences and news sequences can include multiple tracks, the information in this section is specific to Sequences.
Adding and Removing Sequence Tracks
When you create a new Sequence, you get one video track and two audio tracks by default. If your creative vision requires you to have more tracks, you can easily expand your Sequence using the Add Tracks button on the Sequence Timeline. Sequences can include a maximum of four video tracks and eight audio tracks.
When you load the Sequence Timeline for the first time in a user session, the toolbar shows the Add Video Track button by default. If you click the button, a new video track is added to the Sequence. If you use the turn-down arrow to the right of the button to add an audio track, the toolbar displays the Add Audio Track button. Each time you add a new track, the button is toggled to display the previous action. This behavior allows you to easily add multiple tracks of the same type in quick succession.
The following illustration shows the available options after you click the Add Track turn-down. In the following illustration, the toolbar displays the icon for the Add Video Track option.

If your Sequence includes tracks that are no longer required, you can use the Track Selector on the far-left of the Sequence Timeline to delete a track.
n If you delete a track, you delete any edits on that track. If you accidentally delete a track you can press Ctrl+Z (Windows) or Command+Z (macOS) to undo the action.
n Graphic tracks for Sequences that are associated with Newsroom Management stories cannot be deleted from the Sequence Timeline. To remove graphic tracks, you must remove the graphic itself.
To add an audio or video track to a Sequence:
-
Click the turn-down arrow to the right of the Add Tracks button and select one of the following options:
-
Add Video Track
This adds one new video track to the Sequence. Sequences can include up to four video tracks.
-
Add Audio Track
This adds one new audio track to the Sequence. Sequences can include up to eight video tracks.
-
-
Click the Add Video Track or the Add Audio Track button in the Sequence Timeline toolbar to add a new track.
The type of track that is added to the sequence depends on the icon displayed in the toolbar.
To delete a track from your Sequence:
-
Right-click on the track in the Track Selector and select Delete Track: <track name>.
If you delete a track that is neither the highest-level video track nor the lowest-level audio track, the remaining tracks are renumbered so that they appear sequentially in the Track Selector.
Renaming Tracks
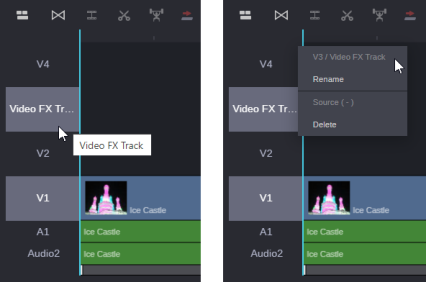
Sequences allow you to assign custom naming to both audio and video tracks. As shown in the following illustration, A2 has been renamed as “Audio2” and V3 has been renamed as “Video FX Track”.

If you assign a name that is longer than the space allowed for the track column, the name appears with ellipses at the end so that you know there are hidden characters. You can display the full track name by either hovering your cursor over the track name, or by right-clicking the track. The hover tool-tip supports word-wrap for very long names, while the context menu displays the original track name and the new track name (no word-wrap).
Note the following:
-
You cannot assign a track name that is too similar to a standard track name. For example, you cannot rename track V3 to “V9” or even “V99”.
-
Track names cannot be blank. They must have at least one character.
-
This release does not support the ability to create multiple tracks with the same name.
-
Custom track names do not appear in the Storyboard tab.
-
Custom track names appear in both MediaCentral Cloud UX and Media Composer — regardless of where the name change occurred.
To assign a new track name:
-
Right-click the track in the Track Selector and select the Rename option from the context menu.
-
Enter your new track name and click OK to confirm, or Cancel to exit without saving.
If you have already assigned a custom name to the track, you can clear the Track Name field in the dialog window to revert the track to its default name (V1, A1, etc).
To undo the name change:
-
After renaming the track, click anywhere in the Asset Editor to return focus to that area of the UI.
-
Press Ctrl+Z on the keyboard to undo the change.
If you load a different sequence, end your user session, or take another action that resets the undo list, you must manually reset the track name instead of using Ctrl+Z.
Using the Track Selector
The Track Selector on the far left side of the Sequence Timeline allows you to enable and disable source and record tracks — which has a significant impact on the editing process. New Sequences include V1, A1, and A2 tracks by default, with the default track patching enabled (V1 to V1, and so on). If you change the track selection, this information is retained in temporary (local) session storage on a per-sequence basis.
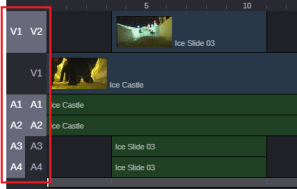
You can right-click on the Track Selector to display a context menu that provides you with actions such as track patching, deleting tracks, and more. The following illustration shows an example Sequence with two video tracks and four audio tracks. The Track Selector is outlined in red.

Notice that there are two columns of track names. The column on the left represents the tracks associated with the asset that is loaded into the Source Monitor of the Asset Editor. The column on the right represents the available tracks in the Sequence. In this illustration, the user has added a second video track and has patched V1 (source) to V2 (record).
When working with multiple tracks, you might encounter a circumstance in which you must edit source audio or video onto a track other than the parallel track displayed in the Track Selector. To edit the source material onto another record track above or below it, you must patch the source track to the targeted record track. Audio can patch only to audio, and video only to video.
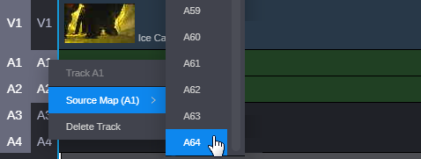
The following illustration shows a source asset with 64 audio tracks. In this example, the user is in the process of patching source track A64 to record track A1.

As you already know, the Asset Editor allows you to drag and drop assets directly to the Sequence Timeline. However in some cases you must use the patching options in combination with keyboard shortcuts or buttons in the user interface to complete your edit. For example if you have a source asset that includes V1, A1, and A2 and you want to edit that asset to the V2, A3, and A4 tracks, you cannot perform this type of edit using the drag and drop method.
Patching changes are tracked with each source asset. If you load a new asset into the Source monitor after making a change to the track patching, the tracks are reset to their default order. If you load the previous asset, the patching changes are recalled for that asset. These changes are tracked for the current user session only.
After you patch a track, a Reset option appears in the patching context menu under the final track. You can click the reset option to revert all track patching back to the default configuration.
To enable or disable tracks in the Track Selector:
-
Click on the track name in either the record or source columns to toggle the track on or off.
To patch tracks in the Track Selector:
-
Right-click on the track name in the record column and select a new source from the menu.
The source track is patched to the destination record track.
Track patching is not associated with individual sequences. The patches made to one sequence are maintained (if possible) as you load subsequent sequences in the same session.
To reset all track patching back the defaults:
-
Right-click on the track name in the record column and select the Reset option at the bottom of the context menu.
Linking and Unlinking
When you add an asset to your sequence that includes multiple tracks, the segments on those tracks are linked together by default. If you move a segment to a different position in the timeline, the associated segments tracks generally move with it (unless you take steps to modify that behavior). When working with a Sequence, you can sever the relationship between the segments by unlinking them from each other. After you unlink the segments, each behaves independently from the other by default.
Alternatively, you can link segments that were previously unlinked or even link segments together that had no prior relationship. For example you could link a video segment from one asset with the audio segments of a different asset.
n Linking and unlinking changes are not saved with the sequence. If you load another sequence in the Asset Editor or reload your sequence in a different user session, the segments revert to their original associations.
To unlink or relink audio and video segments:
-
Do one of the following to define your selection:
-
Click a segment in the Sequence Timeline to select it.
-
Ctrl+click two or more individual segments.
-
-
Do one of the following to either unlink or link the segments:
-
Right click on your selection and select Unlink from the context menu to disassociate the selected segments.
-
Right-click on your selection and select Link from the context menu to link the segments together.
-
n After you use the link or unlink commands, you cannot use Undo to revert the action.