Using the Commands Menu
In several locations of the MediaCentral Cloud UX user interface you might notice a “Commands” menu entry in an App menu or context menu of an asset. The Commands menu allows you to trigger "commands". These are platform automation actions that administrators can also configure for automated execution in the Rules Editor and Schedule Editor apps.
The following topics provide information on the Commands menu and how to trigger commands:
Commands Menu: Basics
Apps that support triggering commands provide an “Commands” menu item in the App Menu and the context menu of a selected asset to let you select the command to be started. These are:
-
Browse app: App Menu and context menu
-
Search app: App Menu and context menu
The contents of the Commands menu depends on user privileges and selected asset type.
The Command menu is not shown in the context menu of an asset or the App Menu in the following cases:
-
If you are not entitled to start commands at all.
-
If you select more than one asset.
-
If you select an asset type that is not supported by commands.
-
If you select a folder in the Browse app.
-
If no asset is selected.
Commands Menu: Supported Asset and Command Types
Access to commands in the Commands menu is controlled by entitlements. Each command is only available for users of a group that has the corresponding entitlement assigned:
-
Media Export: Action Publisher
-
Notifications: Action Notification
-
Publish: Action Publisher
Besides user entitlements, the type of the selected asset determines which commands are shown in the Commands menu, as described in the following sections.
Avid Production Management/MediaCentral Production Management
The Commands menu is available for the following asset types in the Browse and Search apps and gives access to the following commands:
|
Asset Type |
Supported Command |
|---|---|
|
|
Asset Management
The Commands menu is available for the following asset types in the Browse and Search apps and gives access to the following commands:
|
Asset Type |
Supported Command |
|---|---|
|
|
|
|
Wolftech News
The Commands menu is available for the following asset types in the Search app and gives access to the following commands:
|
Asset Type |
Supported Command |
|---|---|
|
|
Starting a Media Export Command
Using the Media Export command you can start the following Next Gen Media Services (NGMS) workflows for a selected Avid Production Management or MediaCentral Production Management asset:
-
Export the Production Management master clip, subclip or sequence to the following destinations:
-
SMB Share (CIFS)
-
AWS (Amazon Web Services) cloud storage
-
GCP (Google Cloud Platform) cloud storage
-
-
Send the selected Production Management master clip or completed sequence to Avid Stream IO (Send to Playback to Stream IO)
This workflow applies to single devices only. STP to a Studio of Stream IO devices is not supported in this release.
n In this release, the NGMS Export and Send To Playback workflows are provided as a Technical Preview.
Note the following:
-
To use the Media Export command, for each destination a profile of type "export" must have been created by an administrator in the Media Services Profile Builder app. For more information, see "Using the Media Services Profile Builder App" in the Avid MediaCentral Cloud UX Installation Guide.
-
If no export profile has been created yet, the Specifications field in the Media Export Command window will show a “No specifications available” message.
-
If more than one profile is available and you are not sure which profile includes the desired export option, check with your Production Management administrator.
-
The Media Export Command window does not provide an "Overwrite" option. The Overwrite policy is defined in the selected profile in the Media Services Profile Builder app.
-
The Target Filename field represents the actual file name in all export workflows. If you omit this field, MediaCentral Cloud UX creates the file automatically using the following file format: avid-pmplus-<systemID>-<assetType>-<assetID>.mxf.
For example: 'avid-pmplus-EEE274DF-BFE6-46CD-BAAA-FB58CA0134F2-masterclip-060a2b340100000001010f0013-000000-58ccce8300e91e70-060e2b347f7f-2a80.mxf’
In a Send to Playback workflow, the Target Filename also represents the Video ID. Since Media Export enables multiple workflows, the Media Export window does not identify this field as a requirement. However if you are completing an export to an STP destination (such as Avid Stream IO), you should consider this field as mandatory. In this case, the resulting file is named <Video_ID>.mxf
To start a Media Export command:
-
In the Browse or Search app, select the asset for which a Media Export is to be triggered.
-
Do one of the following:
-
Right-click the asset and in the context menu that opens select Commands > Media Export.
-
Click the App Menu button and select Commands > Media Export.
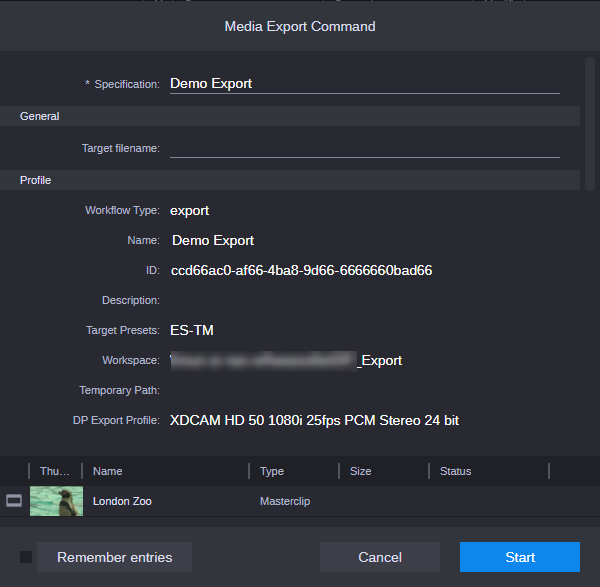
The Media Export Command dialog box opens.
-
-
Select an export profile from the Specification list. The list shows all profiles of type "export" that have been created in the Media Services Profile Builder app.
If there is only one profile, the profile is already selected and shown in the Specification list.
The profile shows the Media Services profile attributes and the attributes of the referenced Media Services presets as read-only fields.
-
(optional) Provide a file name for the exported file in the Target filename field.
If you are completing an export to an STP destination, you should consider this field as mandatory. In this case, copy the Video ID – or any other meaningful piece of metadata that you want to be the filename – into the Target Filename field.
A maximum of 64 characters is allowed, blank spaces are not allowed. Valid characters are 0-9 a-z A-Z -_( )
If you do not provide a Target Filename, the system will create one in the form "avid-pmplus-<systemID>-<assetType>-<assetID>.mxf".
-
(optional) Save the selected and entered values.
-
Click the Remember Entries button to directly save the entered values.
-
Select the check box to save the values when the Command is started.
The values are saved in your User Settings and are persisted across sessions. The next time you create a Media Export command, the Command dialog box will show the saved values.
-
-
Click the Start button to start the command.
-
(optional) Open the Process app and monitor the progress of the Media Export job. You can see the following:
-
The name of the job is "Media Export started by <user login name>".
-
If you enable "Display groups", the job is shown under the group "Action: xform-mediaexport".
For more information, see Working with the Process App.
-
Starting a Notification Command
Using the Notification command you can start notifications and define which user groups of the MediaCentral platform User Management (IAM) should receive the notifications.
n By default, up to 10 groups can be added to an individual notification command.
When the Notification is sent, the configured users will receive a notification that includes a link related to the asset of the notification: When a user clicks the notification, the default app of the asset opens in MediaCentral Cloud UX. For more information, see The Notifications App.
To start a Notification command:
-
In the Browse or Search app, select the asset for which a notification is to be send.
-
Do one of the following:
-
Right-click the asset and in the context menu that opens select Commands > Notification.
-
Click the App Menu button and select Commands > Notification.
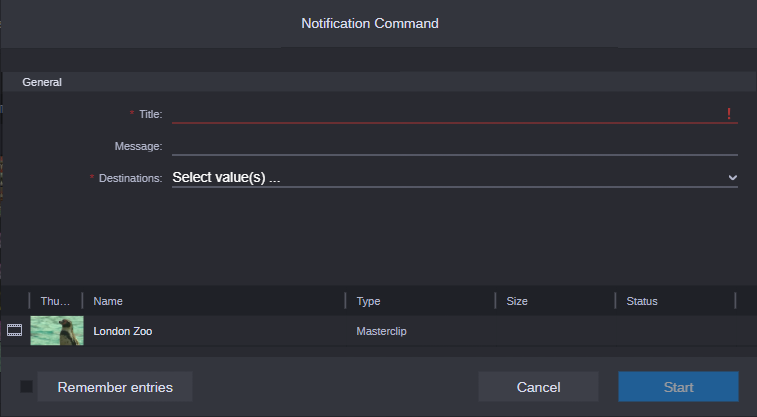
The Notification Command dialog box opens.
-
-
Type a name in the Title field.
-
Type a message text in the Message field.
-
Select one or more groups which should receive notifications from the Destinations list. By default, you can select up to 10 groups.
The Destinations list shows all user groups that are retrieved from the MediaCentral IAM.
-
(optional) Save the selected and entered values.
-
Click the Remember Entries button to directly save the entered values.
-
Select the check box to save the values when the Command is started.
The values are saved in your User Settings and are persisted across sessions. The next time you create a Notification command, the Command dialog box will show the saved values.
-
-
Click the Start button to start the command.
-
(optional) Open the Process app and monitor the progress of the Notification job. You can see the following:
-
The name of the job is "Notification started by <user login name>".
-
If you enable "Display groups", the job is shown under the group "Action: platform-notification".
For more information, see Working with the Process App.
-
Starting a Publish Command
Using the Publish command you can trigger publishing without using the MediaCentral Publisher app. The following can be published:
-
Avid Production Management/MediaCentral Production Management master clips, subclips and sequences
-
Asset Management video-type assets, EDLs and images
To start a Publish command:
-
In the Browse or Search app, select the asset to be published.
-
Do one of the following:
-
Right-click the asset and in the context menu that opens select Commands > Publish.
-
Click the App Menu button and select Commands > Publish.
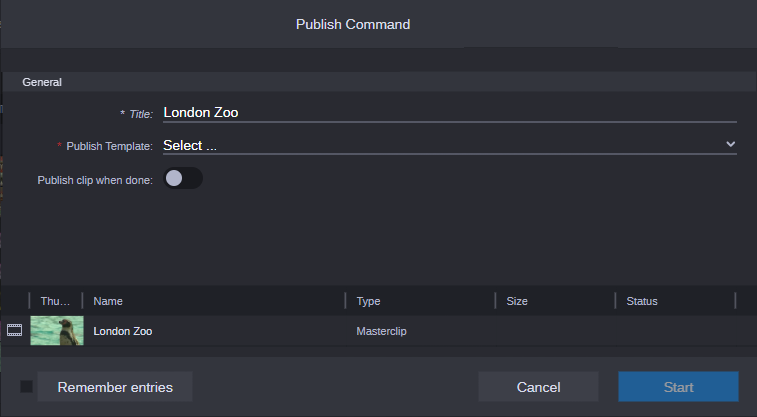
The Publish Command dialog box opens.
-
-
(optional) Change the shown title of the clip to be created in Publisher in the Title field. By default, the asset name is set in the Title field.
If you entered another title but want to restore the default title, double-click the "Tracks" label.
-
Select the publish template to be used from the Publish Template list.
The list shows all templates of type Video and Image.
-
(optional) Change the status of the "Publish clip when done" toggle.
-
If toggled on, the asset is published to the defined targets of the selected template after it is imported to the Publisher backend.
-
If toggled off (default), the asset is not published after it is imported to the Publisher backend.
-
-
(optional) Save the selected and entered values.
-
Click the Remember Entries button to directly save the entered values.
-
Select the check box to save the values when the Command is started.
The values are saved in your User Settings and are persisted across sessions. The next time you create a Publish command, the Command dialog box will show the saved values.
-
-
Click the Start button to start the Publish command .
-
(optional) Open the Process app and monitor the progress of the Publish action. You can sse the following:
-
The name of the job is "Publish started by <user login name>".
-
If you enable "Display groups", the job is shown under the group "Action: publish".
For more information, see Working with the Process App.
-