Creating Crash Recordings
The Acquire app enables you to easily create Crash recordings. Crash recordings do not use forms and will only contain the "name" metadata item when started. However, users can edit such recordings while they are still in progress and enter custom metadata.
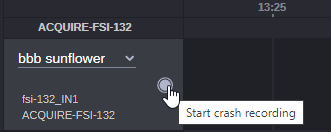
To create crash recordings:
-
Click the Start Crash Recordings button to start the crash recording. The Start Crash Recording button appears on mouse over on the idle channel with a selected source.
The clip will begin recording, and the Start Crash Recording button changes to red. The tool tip changes to say “Stop current Recording”. You can edit any properties of this recording (such as the recording name or the form) until the recording is ended.
n Default duration of a crash recording is set in the Scheduling Options. Crash recording duration includes recording pre-roll time. Due to this, the actual recording will be shorter for the time used by an ingest server to start the recording.
n The name of the crash recording is set in the Scheduling Options window in the Acquire Settings app. For more information, see "Scheduling Options" in the Avid MediaCentral | Cloud UX Installation Guide.
-
When you are ready to stop the Crash recording, click the Stop Current Recording button. The current Crash recording will stop.

-
(Optional) To change the source during an ongoing crash recording, use the drop-down next to the source name in the Channels View, or right-click the recording and select Edit. For more information, see Changing Source During Recording.