Downloading an Image
After loading a video media asset, you can use controls in the Asset Editor to export the image that is currently shown in the Media Viewer to your local workstation. If the asset is associated with multiple resolutions, MediaCentral Cloud UX creates the exported image from the highest resolution media available on the source asset management system. If the Media Viewer includes a text overlay, such as Marker text, this overlay is not included in the downloaded image file.
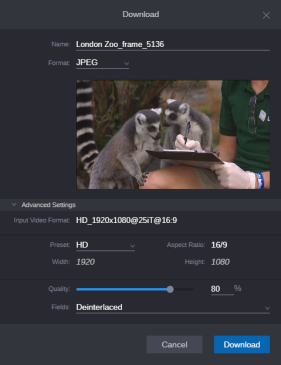
As shown in the following illustration, the Download window provides a preview of the image that will be downloaded to your local workstation. If you adjust options in the Advanced Settings area of the Download window, the image preview is updated to reflect your changes.

You can download images from either a Production Management or an Asset Management module. If you are working in a multi-site environment, Avid supports the ability to download an image from local or remote media assets.
If you load an image file from an Asset Management module, the high-resolution source asset is downloaded to your local workstation. In this case, you are not provided with any controls to adjust the image properties.
n Your ability to download source image files depends on Asset Management user privileges and rules. Downloads might be tracked, depending on your company policy. Download tracking can be enabled and disabled by your Asset Management administrator. These same rules do not apply to Production Management assets.
To download an image:
-
Use the Browse or Search apps to find and load an asset that includes a video track into the Asset Editor’s Media Viewer.
n You cannot download an image from an audio-only media asset. This includes MP3 audio media files that might include an embedded image.
-
Click on the Download button in the media and playback controls.
-
If you loaded a video asset into the Media Viewer, the Download window appears.
-
If you loaded an Asset Management Image file, the high-res version of the source asset is downloaded to your local workstation.
This process also triggers a task in the Process app. If successful, the Message column reports “Custom Tracking Succeeded”.
The Download button is available through the Show More Controls button in the Asset Editor. Alternatively, you can select the option for Two Rows of Buttons. For more information, see Media and Playback Controls.
-
-
(optional) Enter a custom name for the image.
The default value for this field includes the name of the asset and the frame number on which your blue position indicator bar is currently parked. For example: London Zoo_frame_5136
-
Use the Format menu to select the type of image file that you want to download. You can download the image as either a JPEG or PNG file.
-
(optional) Click the arrow to the left of Advanced Settings to customize the image. The following options can be adjusted:
-
Preset: Use this menu to select a set of default values for your image download. Each of the presets are associated with a specific width, height, and aspect ratio.
The image download process automatically selects a preset that matches the format of the asset in the Media Viewer. For example if you have a a 720p HD media file, the 720 HD preset is selected by default. If you have an asset that does not match a known format, the Custom preset is selected.
-
Aspect Ratio: If you selected the SD or Custom presets, you can select the aspect ratio for your image. This option is locked for all other preset types.
-
If you select SD, the Aspect Ratio menu offers 4/3 and 16/9 options.
-
If you select Custom, the Aspect Ratio menu offers 4/3, 16/9, and Custom options.
-
-
Width and Height: If you selected the Custom preset, you can enter a custom width or height for the image.
-
If you select either the 4/3 or 16/9 options, the width and height values maintain the selected aspect ratio — so if you change one value, the other value is adjusted automatically.
-
If you select the Custom option, the width and height values are independent from each other. You can enter any custom Width or Height value.
-
-
Quality: If you selected JPEG from the Format menu, you can adjust the compression ratio for the image either by using the scroll bar to select a new value or by entering a new number in the percentage field. You can enter a value from 1 (lowest quality) to 100 (highest quality).
If you selected PNG from the Format menu, the Quality options are disabled.
-
Fields: If you are downloading an image from an interlaced media format, such as 1080i, you can select which field is downloaded. If you have a progressive media format, this option is disabled as it does not apply.
If you have interlaced media, select one of the following options:
-
Deinterlaced: The download recombines the first and second fields into a full frame.
-
First: The first field of the frame is downloaded.
-
Second: The second field of the frame is downloaded.
-
-
-
Click the Download button to save the image to your local workstation.
The file is saved to the download location specified in your web browser’s settings. During the download process, you can check on the Process app to monitor the progress of the download.
n Depending on your browser settings, you might be prompted for a download location.