Working with Transition Effects
When editing a Sequence or a news sequence, you can add transition effects between segments in the Sequence Timeline. When you add a transition, the effect is centered on the cut by default. However, you can adjust the parameters of the effect to either start or end at the edit point. Alternatively, you can assign a custom number of start and end frames.
Sequences allow you to add transition effects over audio segments as well. In the context of an audio-only dissolve, the effect is referred to as a cross fade. This is different from the behavior of news sequences where audio dissolves are created automatically. For more information, see Working with Audio Tracks in a News Sequence.
The standard default length of each transition is 40 frames, but you can create an effect as short as 1 frame for transitions that Start or End at Cut. If you add a transition that is centered on the cut, effect must be at least 2 frames long. Centered transitions must be entered as an even number of frames. If you enter an odd number, MediaCentral Cloud UX automatically adjusts the length to the next lowest even number. For example if you define a length of 45 frames on a centered transition, the effect is saved as 44 frames when applied.
The only restriction to the length of the transition is that it cannot extend beyond the asset or assets to which it is applied. The transition extents (number of leading or tail frames) are limited by:
-
You must have enough underlying media of either segment to support the transition.
-
Any existing transition extending from the other end of the segment. In other words, you cannot overlap two transitions on the same track.
-
(news sequences only) The start and end of the sequence. For example, you cannot add a Centered transition to the end of the sequence.
Using the Dip to Color Controls
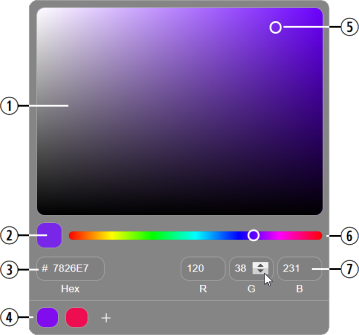
When you add a dip to color effect, the Asset Editor provides controls that allow you to define the precise color that will be used in the effect. The following illustration and table identify these controls.

|
# |
Description |
# |
Description |
|---|---|---|---|
|
1 |
Palette window |
5 |
The cursor position in the palette window |
|
2 |
Color swatch: Displays an example of the currently selected color |
6 |
Color palette slider |
|
3 |
Hex value text box |
7 |
RGB values. In this image, the cursor is placed over the G (green) value to illustrate the up/down menu option. |
|
4 |
Saved favorites |
|
|
Adding a Transition Effect
To add a transition effect:
-
Do one of the following:
-
If you want to apply an effect to a single transition point, place the position indicator on the cut where you intend to add the transition.
n If your sequence includes a single Mark In or Mark Out point, the transition uses the start or end of the sequence as the second mark point. If you want to add an effect to a single transition point, you must ensure that your sequence does not include any In or Out marks.
-
If you want to apply effects to multiple transition points simultaneously, add Mark In and Mark Out points to the sequence. Effects will appear at all transitions that are included in the marked region. In the case of a Sequence, this applies to both video and audio tracks.
If your marked region already includes an effect, the effect is overwritten after you click OK at the end of this process.
-
-
(Sequences only) Use the Track Selector to specify the tracks on which you want the effect to be applied.
-
Dissolve: Applies dissolve effect to all selected tracks, using the settings that you define below.
-
Dip to Color: Applies the dip to color effect to the video track. A dissolve effect is applied to any enabled audio tracks, using the same positioning and duration settings as the dip to color effect.
-
-
Do one of the following:
-
Click the Add Transition button in the Sequence Timeline toolbar.

-
Press the Backslash key (\).
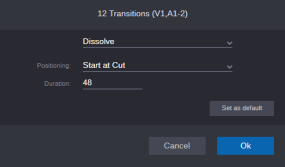
The Transition parameters window appears (example for a Sequence).

If you added In or Out marks (or both) to the sequence, the Transition parameters window displays the total number of effects that will be added. In the case of a Sequence, the window also displays the enabled track names as shown in the following illustration.

n If one or more assets do not include enough media to create the effect, the Transition parameters window is replaced with a warning message.
-
-
Use the Transition menu to select the type of effect that you want to apply:
-
 Dissolve — Fades the video and/or audio from one asset into the next.
Sequences allow you to add dissolves between a segment and empty space, or filler, on the timeline to replicate a fade-in from black or fade-out to black effect.
-
 Dip to Color — Fades from the outgoing video to the color that you select in the color palette (single opaque frame) and then fades up to the incoming video.
If the Dip to Color effect is unavailable, make sure that you have at least one video track enabled in the Track Selector. This effect cannot be applied to audio-only sequences.
-
-
Adjust the parameters of the effect as desired.
-
Click on the Positioning menu to alter the default behavior of Centered to any of the other options in the menu.
-
Adjust the timing of the effect.
-
If you select the Centered, Start at Cut, or End at Cut options, you can enter a value in the Duration field to define the length of the transition (in number of frames).
The default duration of 40 frames on a Centered transition divides the effect evenly across the two assets (20 frames in the leading segment and 20 frames in the trailing segment).
-
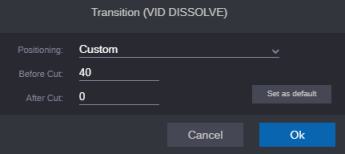
If you select the Custom option, you can define the length of the transition, based on the number of frames before and after the cut. Additionally, if you select Custom and you specify equal before & after values, the effect is saved as a Centered effect.
The following illustration shows a dissolve for a news sequence. If you apply a transition effect to a Sequence, the window displays the tracks on which the effect will be applied.

n If you do not have enough media to allow for the default centered / 40 frame transition, or if you are adding an effect to the start or end of a segment, the Transition parameters window defaults to one of the other position types.
-
-
-
(Dip to Color only) Click the Color Palette button to the right of the Transition menu to select a color.
-
Define a color value by doing one or more of the following:
-
Use the cursor to select a color from the palate window.
-
Drag the slider left or right.
-
Click inside the Hex code text box and type a value.
-
Click the R (red), G (green), or B (blue) text boxes to enter specific values.
-
Hover your cursor over the RGB values to display an up/down menu and click one of the arrows to increment or decrement the current value.
-
-
(optional) After you have defined a color, you can click the plus button at the bottom of the window to save the color as a favorite.
Favorite colors are saved on a per-user basis and are recalled whenever you access this window.
c Take care when clearing your browser cache as that action deletes the saved favorite colors from your local workstation.
-
Click OK when done.
-
-
If you want to save the effect parameters as your default, click the Set as Default button.
The system saves the type of transition effect, duration, position, and color value (Dip to Color only). This setting affects your user account only and the saved values are remembered across of your user sessions for all sequences.
-
Click OK to save the transition parameters and apply the effect.
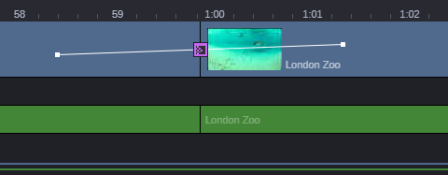
The following illustration shows a centered dissolve between the two segments of a sequence.

-
You can view the transition in the Media Viewer by playing or scrubbing through the sequence.
Transitions are defined at the trailing end of a segment. If you change the position of a segment, you might need to adjust the parameters of the effect. For example if you drag a segment that is centered on the cut to the end of the sequence, the transition is now essentially an end at cut effect. In this case you must verify that the effect parameters are still valid.
Adjusting an Existing Effect
If you need to alter a transition after you add it to the sequence, you can adjust the parameters of the effect through a dialogue window or through trim controls available directly on the sequence.
To adjust the parameters of an existing transition:
-
Double-click on the transition icon in the Sequence Timeline and adjust the parameters in the Transition parameters window.
-
Right-click on the transition icon in the Sequence Timeline and select Modify Effect from the context menu.
-
Position your cursor over the beginning or end of the effect in the Sequence Timeline and drag the transition’s head or tail to trim the length of the effect.
As shown in the following illustration, the cursor changes to a double-sided arrow when placed over the head or tail of the effect.

If you add a centered transition, this action trims both ends of the effect. If your transition starts or ends at cut, the trim action alters only one end of the effect.
n You cannot overlap transitions. If you attempt to drag one transition over another, you are stopped at the point where the two effects meet.
-
Position your cursor over the beginning or end of the effect, press and hold the Ctrl key, and drag the transition’s head or tail to trim the length of the effect and alter the positioning of the effect.
If originally Centered, holding the Ctrl key trims one end only. If initially not-centered, the effect becomes centered and the trim alters both the head and tail.
Deleting a Transition Effect
To delete a transition effect:
-
Click on the transition icon in the Sequence Timeline and press the Delete key.
-
Right-click the transition icon in the Sequence Timeline and select Delete Effect.