Understanding the Graphics Tab
MediaCentral Cloud UX systems that are licensed for a graphics workflow include an additional tab in the Asset Editor labeled: Graphics. When you load a graphic element (template or item) into the Asset Editor, this tab includes the controls that you can use to customize the graphic. Templates are created in the Maestro Page Editor with predefined controls. The scope of changes that you are allowed to make to the element are defined by these controls (which can vary from template to template). For more information on creating templates, see the Maestro News documentation.
In addition to the Graphics tab, a preview of the graphic is displayed in the source monitor of the Media Viewer. For more information, see Previewing Graphic Elements.
n If you do not see the Graphics tab, ask your MediaCentral Cloud UX Administrator to verify that your user account is associated with either an Edit client license and that the required entitlements are applied to your account through the User Management Administrator app.
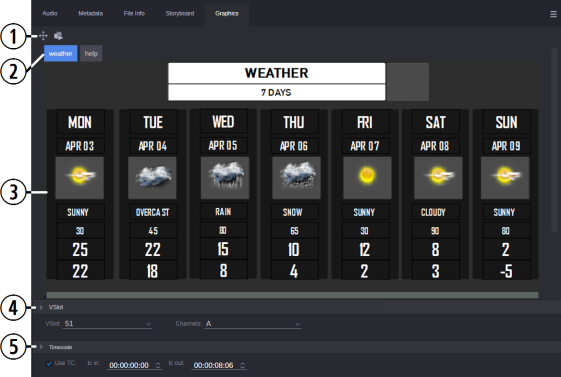
The following illustration and table describe the different areas of the Graphics tab.

|
|
Section |
Description |
|
1 |
Graphics Toolbar |
The toolbar includes controls such as Drag, Save, and Render. For more information, see The Graphics Toolbar. |
|
2 |
Tabs |
The tabs area allows you to switch between the Viewer Panel and the Help Panel. If configured in the template, you can click on the Help tab to see additional information about how the graphic can be customized. |
|
3 |
Viewer Panel |
This area displays the graphic template and includes the controls to customize the graphic. |
|
4 |
VSlot Panel |
This area of the Graphics tab allows you to assign a VSlot and Channel to the graphic. Virtual Slots are visual layers in a channel (preview or on-air). n Access to the VSlot panel is dependent on your user rights in the Maestro News system. For more information, refer to Modifying VSlot and Channel Assignments and “Virtual Slots” in the Avid Maestro | News User Guide. |
|
5 |
Timing Panel |
This allows automatic cuing of a Maestro graphic at a specified time in a MediaCentral Newsroom rundown. Additionally, the timing panel allows you to determine the length of time in which the graphic asset is displayed. If the graphic includes animation, the length of the animation adapts to the specified In and Out Marks. For more information, see Modifying In-Out Timecode. |
The Graphics Toolbar
The following table briefly explains the purpose of each button in the toolbar.
|
Button |
Action |
Description |
|
|
Drag |
Click and hold the Drag button to drag and drop the graphic asset into a Newsroom Management rundown or associated sequence. When editing an item, the Drag button is replaced by the Save button. |
|
|
Render |
Click this button to render the animated graphic preview and load it into the Media Viewer. As previously noted, the ability to preview a graphic asset requires integration with a Maestro Render server. For more details, see Previewing Graphic Elements. |
|
|
Save |
If you load an item into the Asset Editor, you must click the Save button to save any changes you make to the item. Items are saved in the Workspace directory of the Maestro News database. |
|
|
Cancel |
If you load an item into the Asset Editor and make changes to the item, you can click this button to abort changes before clicking the Save button. |
|
|
Refresh all data sources |
This button is only displayed for graphic assets that have external data sources connected to them. Clicking this button refreshes all graphic assets in a template that are connected to external data sources. External data sources such as SQL, RSS, XML, and others are added during the template creation process. For more information, refer to the “Using Queries” in the Avid Maestro | News User Guide. |
Fit to Window
When you load a graphic template or item into the Asset Editor, the Graphics tab often does not show you the entire graphic due to the size of the tabs area of the user interface. To enable you to see the entire graphic at once, you can either expand the size of the Asset Editor or you can right-click in the Viewer panel and select Fit to Window to scale the image to fit the viewer (zoom out).
If you want to zoom back in to the graphic, you can again right-click and select the Fit to Window option to show the graphic at its original size. For additional display options, see The Asset Editor.


