The Asset Editor
The Asset Editor provides you with tools to view and interact with an active asset. The upper area of the Asset Editor provides a preview of most asset types — such as video clips, a still images, or others — in the Media Viewer. This area also provides the appropriate shuttle controls and timecode displays to interact with loaded assets. The Media Viewer includes a Source Monitor and Record Monitor toggle button that allows you to switch between individual media assets and any sequence that is loaded into the Sequence Timeline.
Below the Media Viewer is an area that displays several tabs to show different categories of metadata for the asset. By default, these are the Audio, Hits, Metadata, File Info, and Storyboard tabs. Additional tabs can be added in context when appropriate.
Appearing at the bottom of the user interface, the Sequence Timeline enables you to view and edit a sequence. A portion of media that is contained on a track in a sequence is called a segment. You can use the trim controls on the timeline to adjust segments already contained in the sequence or you can use the Browse or Search apps to add new content to the sequence.
n MediaCentral Cloud UX allows you to drag assets from the Asset Editor to other areas of the user interface. If you have a sequence with unsaved changes, you must save the sequence before the drag and drop operation is allowed. If you attempt to drag an unsaved sequence to another app, the Media Viewer displays the following message: “Drag is disabled, sequence must be saved”.
As shown in the following illustration, the Asset Editor is collapsed by default when you first sign in to MediaCentral Cloud UX or when you open an app. Opening an asset expands the Asset Editor automatically. The Asset Editor is always positioned on the right side of the core app.
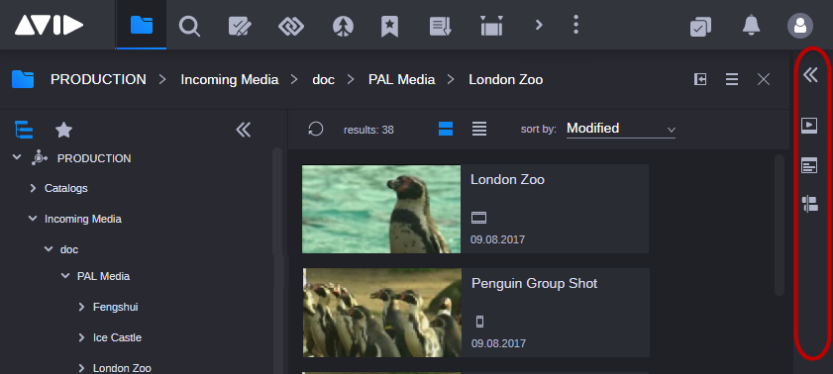
The Asset Editor includes buttons to quickly access different areas of the tool. These buttons include:
|
Button Image |
Button Name |
|---|---|
|
|
Expand / Collapse Asset Editor |
|
|
Media Viewer |
|
|
Tabs: Enables / disables the tabs area as well as toggles the single and dual column view of the Asset Editor. |
|
|
Sequence Timeline |
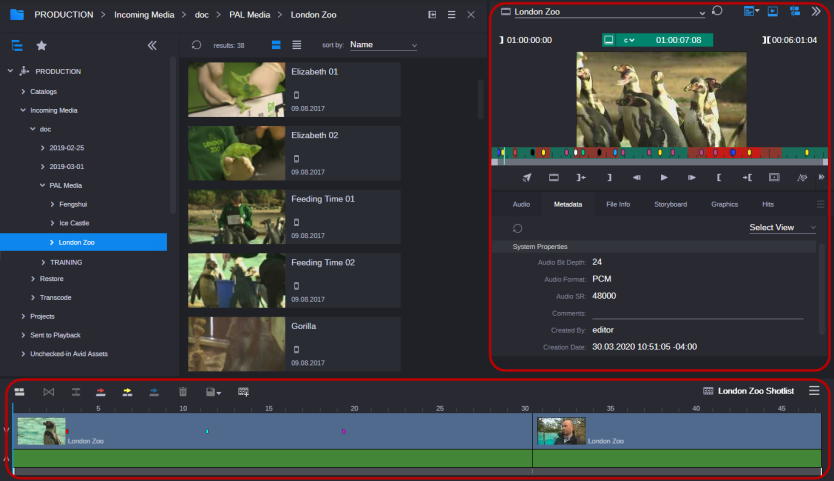
Once the Asset Editor is fully expanded, the Media Viewer, Tabs, and Timeline buttons appear at the top of the tool and are colored blue to indicate that they are open and active. You can click on any of the buttons to show or hide different areas of the Asset Editor.
For instance, you might have an asset that includes a large amount of metadata that you want to review and you are not interested in playing the asset at this time. In this case you could click on the Media Viewer button to hide this area of the tool and provide more screen space for the Metadata tab.
Alternatively, you can use the horizontal divider between the Media Viewer and Tabs regions to increase or decrease the area of either area of the Asset Editor as illustrated below.
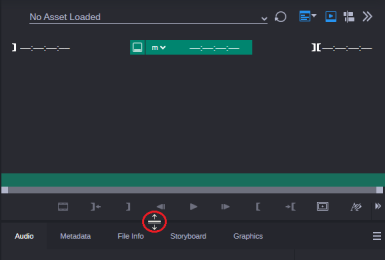
If an area of the Asset Editor is hidden (button is gray), you can use the horizontal divider to reveal the hidden region rather than clicking on the associated button.
The Tabs area of the Asset Editor can be displayed as one or two columns of data. You might want to enable the dual column view if you have an asset that is associated with a large amount of metadata. This option allows you to play the asset while having more space to review the metadata. The following illustration shows the two-column view, where the tabs are displayed to the left of the Media Viewer.
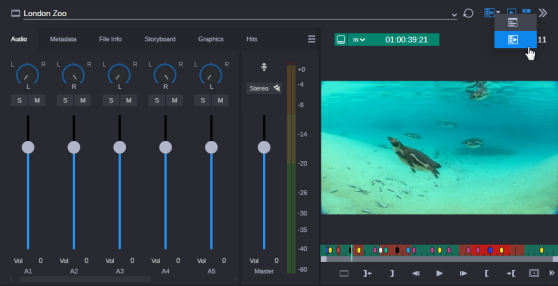
When in dual column view, you can use the divider in the middle of the two columns to increase or decrease the size of either column. Alternatively, you can use the divider on the left side of the columns to increase the overall size of the Asset Editor.
To show or hide the Asset Editor:
-
Click the Expand / Collapse Asset Editor button.
To enlarge or reduce the Asset Editor width:
-
To enlarge the Asset Editor width, click the separator bar and drag the double-headed arrow cursor to the left.
-
To reduce the Asset Editor width, click the separator bar and drag the double-headed arrow cursor to the right.
If you drag the double-headed arrow cursor to the very right of the screen, the Asset Editor is hidden. However if the Sequence Timeline is open, dragging the double-headed arrow cursor to the far right does not close the Sequence Timeline.
If you drag the double-headed arrow cursor of a docked app to the right, the Asset Editor width does not change.
To display the Asset Editor as one or two columns:
-
Click the orientation menu to the right of the Tabs button in the Asset Editor toolbar and select the single or dual column view.
To open an asset in the Asset Editor:
-
Double-click an asset in the Browse or Search app’s Results area.
The asset is loaded and the Asset Editor’s Media Viewer and Tabs areas are displayed.
If you open a sequence, the asset is loaded in the Media Viewer, but the Sequence Timeline is not automatically opened (unless it was manually opened prior to loading the asset).
-
If you Ctrl+double-click (Windows) or Command+double-click (macOS) a sequence, the sequence is loaded into the Source Monitor. Some sequences can be used as source material to edit into other sequences.
For more information, see Working with Media and Editing a Sequence.
Asset Editor Tabs
The Tabs area of the Asset Editor provides a wide range of tools that allow you to interact with an asset.
![]() If you reduce the size of the Asset Editor, some tabs might be obscured from view. You can click the chevrons on the left or right side (as illustrated here) of the Tabs area to display additional tabs.
If you reduce the size of the Asset Editor, some tabs might be obscured from view. You can click the chevrons on the left or right side (as illustrated here) of the Tabs area to display additional tabs.
Configuring Tabs
The menu to the far right of the Tabs header allows you to configure the tabs that you want to view in the Asset Editor. This allows you to customize the user interface so that you have fast access to the tabs that you use the most.
To configure the Tabs view:
-
 Open the Asset Editor and click the Tabs menu button.
The menu might display one or more options, such as Actions, depending on your current tab.
-
Hover your cursor over the Show/Hide Tabs option.
A list of options appears on the screen.
-
Select (enable) or deselect (disable) the check boxes to define the tabs that you want to see in view.
-
Click anywhere else in the UI to dismiss the menu.
The following sections provide more information on these tabs.
Reorganizing the Default Tab Order
The Asset Editor allows you to change the order in which the tabs are displayed through a simple drag and drop operation. If you reconfigure the tabs, the changes are saved to your local workstation's cache. If you clear the cache or move to a different workstations, the tab order is not retained. Tab order is also not saved with any custom layouts that you might create.
To reorganize the tabs:
-
Open the Asset Editor and ensure that the Tabs button is enabled (blue).
-
Use your mouse to click and hold a tab.
-
Move the tab left or right to change its position.
The following illustration shows a user moving the Audio tab to the right of the Metadata tab. Notice that a blue bar appears between the tabs to show the drop position.
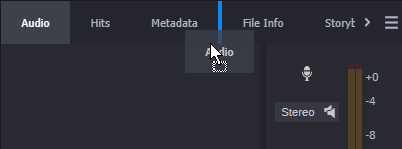
If you want to drop a tab to an off-screen position, such as to the left of the Storyboard tab in the example above, move the cursor to the left or right of the chevron to scroll.
-
Release the button to drop the tab into its new position.
The Audio Tab
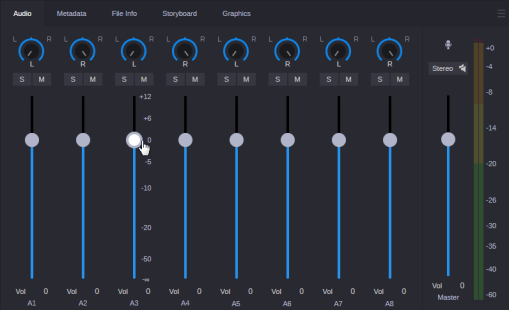
The Audio tab provides you with a lot of different ways to monitor the audio in the asset that you are inspecting. Each track of your asset is displayed (enlarge the Asset Editor or use the scroll bar at the bottom of the Audio tab if you need to see more tracks). You can adjust the master volume (on the right), or levels on individual tracks. And if you want to hear only one track, click the S (solo) button for track, and all other tracks are muted. The following illustration shows the Audio tab with controls to adjust the levels for multiple audio tracks.
For more information, see Working with Audio.
n Adjustments that you make to audio are saved only for sequences that you edit and save in Record mode of the Asset Editor.
The Metadata Tab
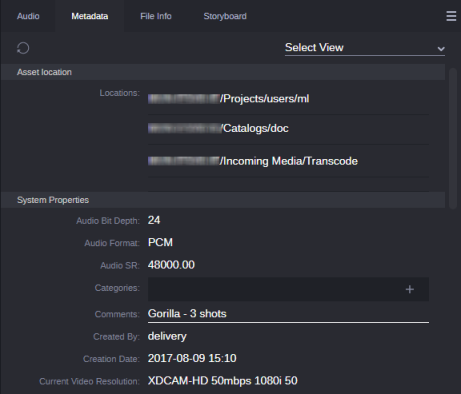
The information displayed in this tab depends on the type of asset that you load into the Asset Editor. For example, a clip stored in a Production Management database and a clip stored in an Asset Management database show different types of metadata. Some items are editable, some are not. The following illustration shows metadata for a Production Management clip.
For more information, see The Metadata Tab.
The Storyboard Tab
The Storyboard tab provides features for editing and viewing metadata added to clips at particular timecodes. Using the Storyboard view you can do the following;
-
View, add, and delete markers and restrictions of Production Management assets
-
View the strata and edit the segmentation of Asset Management assets
-
View the thumbnails of Production Management and Asset Management assets
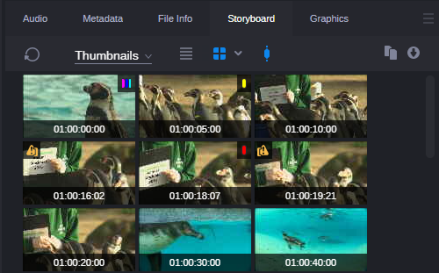
In some cases your asset might have multiple layers of metadata. Production Management assets include layers for each audio and video track, an All markers layer (which displays all markers from all tracks) as well as a Restrictions layer; while Asset Management assets include layers for each level of strata. Common to both systems, the Thumbnails layer displays a group of representative images for the asset that is currently loaded in the Asset Editor. You can control the layer display through a selection menu that is located at the top of the Storyboard tab.
Depending on the type of the asset and selected layer, the Storyboard tab provides different editing options. For example, if you select the Thumbnails layer, different time- and marker-based filter options are available that let you adjust the display of the series of small images of the asset (thumbnails). Viewing and double-clicking thumbnails can help you navigate through lengthy source clips and markers more quickly. The following illustration shows thumbnails set for 10 second intervals as well as thumbnails for markers and restrictions.
For more information, see Working with the Storyboard Tab.
Other Tabs
You might use one or more of these other Asset Editor tabs:
-
The Hits tab provides information about the exact location of phonetic, and marker & segment matches that are returned through a search. See Using the Asset Editor Hits Tab.
-
The Transcript tab generates a speech to text (Transcribe) output of your asset's audio. The text is added to segments that are automatically divided by each individual speaker. For more information, see Using the Transcript Tab.
-
The File Info tab, which provides technical information about video, audio, image, and text files that are associated with a selected asset in the MediaCentral Asset Management database. For more information, see The File Info Tab Layout.
-
The Graphics tab, which is used when adding graphics assets to your story. For more information, see Working with Graphics Management Systems.