Search App Header
Displayed at the top of the Search app, the Search header includes controls that allow you to create and execute a term-based search or to refine the parameters of an existing search.
When you open the Search app for the first time in a new session, a default search term or “pill” is displayed in the left side of the Search header. You can add text to this field, add more terms to narrow your search, or delete all custom terms to create a search based solely on filters that you select in the sidebar. If you add more than one term, each is displayed in the Search header with a randomly selected color.
The following illustration and table describe the controls that are available in the Search header.

|
|
Name |
Description |
|
1 |
Location Pill |
This button allows you to search in a specific location of a Production Management database. For more information, see Using the Location Pill. |
|
2 |
Search term |
As illustrated here, the search term is waiting for you to enter a custom value. |
|
3 |
Add Term |
Adds a new term to the search. For more information, see Searching with Multiple Terms (Multiple Pills). |
|
4 |
Clear Search |
This button removes all search terms and filters and populates the search header with a new, empty term. For more information, see Editing or Clearing a Search. |
|
5 |
Search |
Executes the search. |
|
6 |
Query Mode |
Allows you to display the search terms in either Compact or Form view. |
|
7 |
Dock |
Docks the Search app. For more information, see Docking Apps. |
|
8 |
Context Menu |
Allows you to perform additional actions on assets in the Results area. For more information, see Using the Search Context Menus. |
|
9 |
Close |
Closes the Search app. If you open multiple instances of the Search app, this button closes the current instance of the app. You can access additional instances by left or right-clicking on the Search app button in the Fast Bar. |
Using the Location Pill
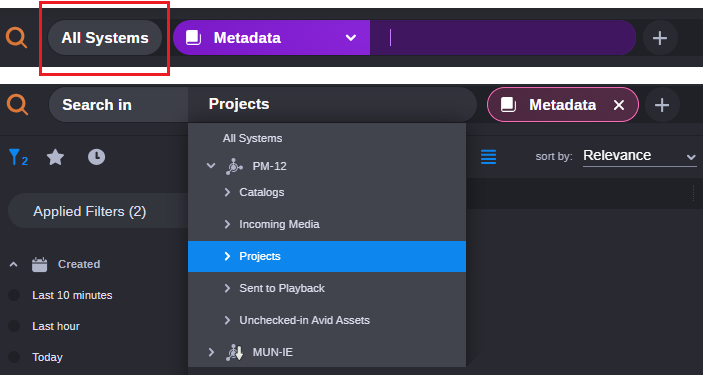
For MediaCentral Cloud UX systems that are integrated with either an Avid Production Management or MediaCentral Production module, the location pill allows you to limit your search to a single Production database, or a specific location within the database. The following illustration shows the Location pill with its default value of All Systems (above), and then with the Projects folder selected within the "PM-12" Production database (below).

If your system is not connected to a Production Management system, the location pill is displayed, but it is locked in the All Systems mode with no option to navigate deeper into a database. Administrators can remove the Location pill from the user interface by deselecting the Search Folder Pill option in the Configuration Settings app. For more information, see "Using the Configuration Settings App" in the Avid MediaCentral | Cloud UX Installation Guide.
When selecting a system through the Location pill, the same system is not automatically selected in the Systems filter in the Search app sidebar. These features work independently of each other. If you select a different system in the sidebar, the results are not cumulative.
n If the Location pill is not working as expected with a MediaCentral Production Management module, ensure that your administrator has enabled Asset Visibility in the Production Administrator client. For more information, see “Reviewing the Manage Status Tab” in the Avid MediaCentral | Cloud UX Installation Guide.
To use the Location pill:
-
Click the Location pill.
The pill defaults to searching for All (Production) Systems. When you click the pill, the Search app displays a menu that lists all available local and remote Production systems.
-
Do one of the following:
-
Select a Production database, or click the chevrons to the left of any database to expand the tree.
-
Click the chevrons to the left of any database to expand the tree and select an individual folder within the database.
If you expand multiple different folders and then you return to the location pill, the tree expands to display the selected folder and its parent folder(s) only. All other folders appear collapsed.
-
-
Click the Search button to execute the search.
You can select only one database or one location in the database using this feature. You can expand your search to include additional systems using the System filter in the Search app sidebar.
Using the Query Mode Button
The Search app displays all terms in the Search header in a compact view by default in which each term is displayed as a pill. This view hides the granular details that are included in each term. If you prefer to see all terms with their full details, you can click the Query Mode button to switch to Form view. The following illustration shows an example search in Form view.

When in this view, terms are always displayed in edit mode. After you exceed five rows of data, a vertical scroll bar appears to the right side of the form window.
If you prefer Form view over the default Compact view, you can change your default preference in the User Settings. For more information, see User Settings.