Working with Audio
This topic describes how to use the Asset Editor’s Audio tab and how to work with audio tracks in the Sequence Timeline.
The Audio Tab
The Asset Editor’s Audio tab provides you with controls for monitoring and adjusting audio levels. Adjustments are saved for sequences in Record mode only. The status of the tab is persistent when loading new assets. For instance if you mute a track in the Audio tab and then you load a new asset, the track remains muted for the new asset.
Working with the Audio Tab in Source Mode
When you load an asset in Source mode in the Asset Editor, the Audio tab displays the audio tracks that are available for monitoring and lets you select which tracks to monitor. MediaCentral Cloud UX can load and monitor up to 24 audio tracks for master clips, subclips, and shotlists, five audio tracks for news sequences, and eight tracks for Sequences. You can adjust the volume for individual tracks or the overall volume. Adjustments are not saved.
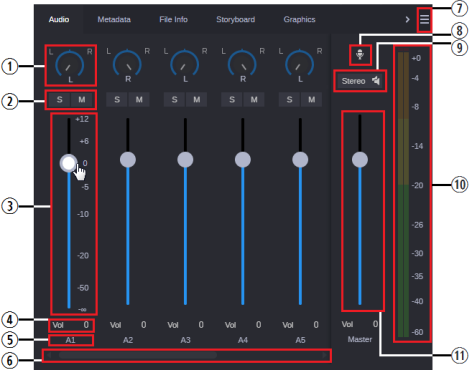
The following illustration shows the Audio tab for a clip in Source mode and identifies the controls. The clip used in this example includes more than four tracks, with tracks 1 through 5 displayed. Other tracks are available by enlarging the tab or by using the scroll bar.

|
|
Control |
Description |
|
1 |
Panning knobs |
Controls the panning for each track. In the current release, the panning buttons inactive for source assets. See Panning for Assets, Shotlists, and Sequences. |
|
2 |
Solo and Mute buttons |
Click the S (Solo) button to monitor only the selected track or tracks. All other tracks are muted. Click the M (mute) button to mute only the selected track or tracks. See Audio Monitoring. |
|
3 |
Volume slider |
When you hover your cursor over a volume slider, audio units appear to the right. You can click and drag the slider to adjust the volume level for an audio track. The level applies only to the selected track, not to the asset. Changes are not saved. See Audio Monitoring. |
|
4 |
Volume level display and text box |
Displays the level selected by the volume slider and allows you to type a level. |
|
5 |
Track identifier |
Displays the name of the audio track. |
|
6 |
Scroll bar |
Drag to view audio tracks that are not displayed. |
|
7 |
Menu button |
The Menu button includes two options:
|
|
8 |
Voice-over button |
Click to open the voice-over controls. See Recording a Voice-Over. |
|
9 |
Mix Mode button |
Select Stereo or Mono to specify the audio output. See Setting the Audio Mix. |
|
10 |
Audio meters |
Displays the audio level for the mix of all tracks in the clip or sequence. There are two meters. For stereo output, each meter displays a separate level. For mono output, both meters display the same level. See Setting the Audio Mix. You can change the reference level of audio monitoring in the User Settings. The default is -20dB. See Setting the Reference Level. |
|
11 |
Master volume slider |
Click and drag the slider to adjust the volume level for overall audio mix in the asset. Changes are not saved. See Audio Monitoring. |
Working with the Audio Tab in Record Mode
When you load a sequence in Record mode of the Asset Editor, the Audio tab displays the audio tracks that are available for monitoring and lets you select which tracks to monitor.
-
Shotlists can display up to 24 tracks, depending on the number of tracks that are available in the source clips. Tracks are identified as A1, A2, and so on. Adjustments made to the audio tracks are for monitoring only and are not saved with the asset.
-
Sequences can display up to 8 tracks of audio. Tracks are identified as A1, A2, A3, and so on. Adjustments made to the audio tracks are saved with the Sequence on a per segment basis.
-
News sequences can display up to five tracks, labeled as NAT, SOT, and VO, depending on configuration in the Production Administrator client. The NAT, SOT, and Voice controls are enabled or disabled depending on the position of the position indicator. Adjustments in Record mode are saved with the source files. For more information, see Working with Audio Tracks in a News Sequence.
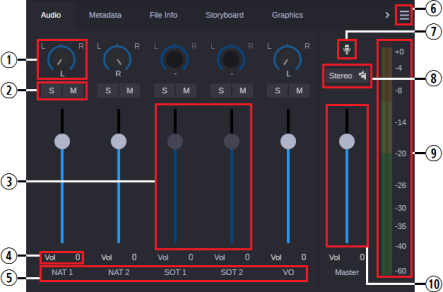
The following illustration identifies controls in the Audio tab when a news sequence is open in Record mode. Note that the timeline’s position indicator (not shown) is currently parked over a portion of the sequence that includes audio on the NAT and VO tracks only. As a result, SOT 1 and 2 are dimmed.

|
|
Control |
Description |
|
1 |
Panning knobs |
Controls the panning for each track. In the current release, the panning buttons are active for Sequences only. See Panning for News Sequences. |
|
2 |
Solo and Mute buttons |
Click the S (Solo) button to monitor only the selected track or tracks. All other tracks are muted. Click the M (mute) button to mute only the selected track or tracks. See Audio Monitoring. |
|
3 |
Volume slider |
Click and drag the slider to adjust the volume level for an audio segment. The level applies only to the selected segment of a track, not to the entire track. These adjustments are saved with the sequence. See Working with Audio Tracks in a News Sequence. |
|
4 |
Volume level display and text box |
Displays the level selected by the volume slider and allows you to type a level. |
|
5 |
Track identifier |
Displays the name of the audio track. When working with a news sequence, mono tracks are labeled NAT, SOT, and VO. For stereo tracks, labels by default are NAT 1, NAT 2, SOT 1, and SOT 2. An administrator can change the labels that identify each track by changing the Application Database Settings in the Production Administrator client. |
|
6 |
Menu button |
The Menu button is not used when in Record Mode. |
|
7 |
Voice-over button |
Click to open the voice-over controls. See Recording a Voice-Over |
|
8 |
Mix Mode button |
Select Stereo or Mono to specify the audio output. See Setting the Audio Mix. |
|
9 |
Audio meters |
Displays the audio level for the mix of all tracks in the clip or sequence. There are two meters. For stereo output, each meter displays a separate level. For mono output, both meters display the same level. See Setting the Audio Mix. You can change the reference level of audio monitoring in the User Settings. The default is -20dB. See Setting the Reference Level. |
|
10 |
Master volume slider |
Click and drag the slider to adjust the volume level for overall audio mix in the sequence. Changes are not saved. See Audio Monitoring. |