Understanding the Actions Menu and Process Creation
In several locations of the MediaCentral Cloud UX user interface you might notice an “Actions” menu entry in an App menu or context menu of an asset. The Actions menu allows you to create an Asset Management process. The following topics provide information on the Actions menu and basic principles of process creation:
Understanding Processes
A process is a defined set of automated workflows and manual activities that are created to achieve a specific goal; it defines the states, tasks, and the control flow that are used to achieve the goal. Processes are modeled to mirror specific business workflows of customers with specific user interactions. When you create a process, you automatically attach the open or selected asset to the process. Use the Tasks app if you want to create a process without initially attached asset(s).
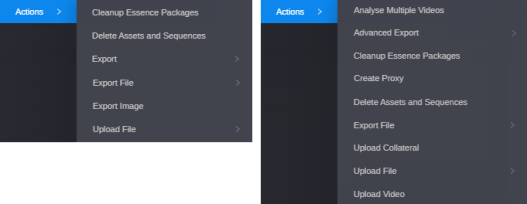
Your ability to create and initiate processes depends on Asset Management user privileges and rules. For example, the credentials you use to sign in to must allow creation of processes. Beyond that, the configuration of the process in Asset Management and in Media Central Cloud UX Process Modeler determines which action can be applied and the number and type of assets that can be attached to a process (for example basic sequence, video or audio, or mixed attachments). Therefore, for example, the Actions menu might show different and fewer processes for an Asset Management image asset (left) than for an Asset Management video asset (right), as shown in the following illustration.
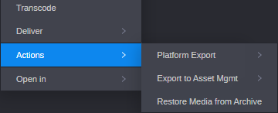
If the required packages are installed or product options are available in Asset Management and the used processes are configured accordingly, you can also attach Production Management assets or a Newsroom Management queue or story to a process. Use the same procedure for creating processes for Asset Management assets and assets from other modules. The following illustration shows an example of the Actions menu for a selected Production Management master clip.
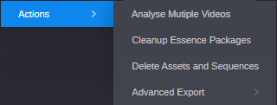
The following example shows the Actions menu for a Newsroom Management queue selected in the Browse app (left) and for a story selected in the Rundown app (right).

For more information, see the Avid MediaCentral | Shared Library User’s Guide.
Actions Menu: Location and Contents
Apps that support the creation of processes provide an “Actions” menu item either in the App Menu or the context menu of selected asset(s) or both to let you select the Asset Management system running the process and the configured process types. These are:
-
Browse app: App Menu and context menu
-
Search app: App Menu and context menu
-
Associations app: Context menu of an associated asset
-
Tasks app: App menu. Here the corresponding menu item is labeled “Create Processes.”
-
Rundown app: Context menu of a story
-
Asset Editor’s Metadata and Storyboard tabs: Tab menu
-
Special case: Asset Editor’s Media Viewer button bar: Instead of the Actions menu, a Quick Send and Player Actions button give access to specific Quick Send and Player Actions processes. See Using Quick Send with Asset Management Modules and Using Player Actions Processes.
The contents of the Actions menu depends on the number of available Asset Management systems, Asset Management user privileges and rules, process configuration and selected asset.
-
If there is one Asset Management system connected to MediaCentral Cloud UX that allows creating processes, the process types are listed as menu entries in the Actions or Create Process menu.
-
If there are several Asset Management systems connected to MediaCentral Cloud UX that allow creating processes, a menu entry with the system name is shown for each system. Within the individual system entries the process types are listed as sub-menu entries.

-
If a process type provides options (for example, different targets or file types for an export process), the process options are listed as sub-menu entries in the process type menu item.

-
If the Asset Management system does not support process creation for the selected asset(s) or no process type is applicable, the menu only shows a “No items” entry.

-
If no asset is selected (Browse and Search app) or loaded (Metadata tab), the Actions menu item is disabled.

-
An “Actions” related error message — retrieving the supported process types has failed or timed out — is shown inside the context menu.

-
The available process types may differ for the same asset type if an individual asset or several assets are selected. In case of multi-selection only the process types that support multi-selection for the selected asset type are shown. For example, Archive Show only supports one attached queue; if your selection includes more than one queue, the Archive Show process type will not be shown as Actions menu option.
The same is true for mixed attachments: If your selection includes assets of different asset types, only the process types that allow attaching all selected asset types will be shown. For example, if you select an image and a video, the Analyse Multiple Videos process type will not be shown as Actions menu option.
-
If the list of process types contains many entries, a scroll bar is displayed that lets you navigate the list.
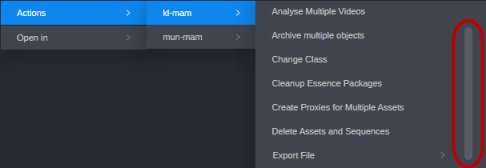
The order in which process types are listed in the Actions menu can be configured by an Asset Management administrator. If sorting of the process types is not configured in Asset Management, the process types appear in an unsorted order in the Actions menu. For more information on configuring the Actions menu, see “Configuring the Actions Menu for MediaCentral | Cloud UX” and “Defining Actions Sub-Menus in MediaCentral | Cloud UX” in the Avid MediaCentral | Asset Management Process Reference.
Basic Process Creation Steps
Although processes are modeled to mirror specific business workflows, they basically share the same interaction patterns. There is one difference regarding the process creation context:
-
In most cases, when you create a process, you automatically attach the open or selected asset to the process.
-
There can be processes that do not require an attached asset upon process creation. These processes can only be created in the Tasks app.
For more information, see Assets and Files as Process Attachments.
To create a process with attached asset(s):
-
Select one or more assets.
-
Do one of the following:
-
(Browse and Search app) Click the App Menu button and select Actions.
-
Right-click the selection and select Actions.
-
-
(if several are available) Select the Asset Management system on which the process is to be created.
-
Select the process type.
-
(optional) If the process type provides a sub-menu, select the desired menu item.
-
In the process creation dialog box that opens, supply the required information, upload files to the process (if supported by the process), and click OK.
To create a process without initial attachment:
-
Open the Tasks app.
-
Click the App Menu button and select Create Process.
-
(if several are available) Select the Asset Management system on which the process is to be created.
-
Select the process type.
-
(optional) If the process type provides a sub-menu, select the desired menu item.
-
In the process creation dialog box that opens, upload files to the process, supply the required information and click OK.
Once created, you can monitor your process in the Process app. For more information, see Working with the Process App.
If the process requires you to take an additional action, the corresponding user task will be shown in the Tasks app. For more information on tasks, see Working with the Tasks App (Asset Management).
For more information on how processes are created in a specific context, see Creating Assets, Uploading Files to Assets, Deleting Assets and Basic Sequences, Removing the Reservation Properties by Using a Process, and Cleaning Up Essence Packages.
Understanding the Process Creation Dialog Box
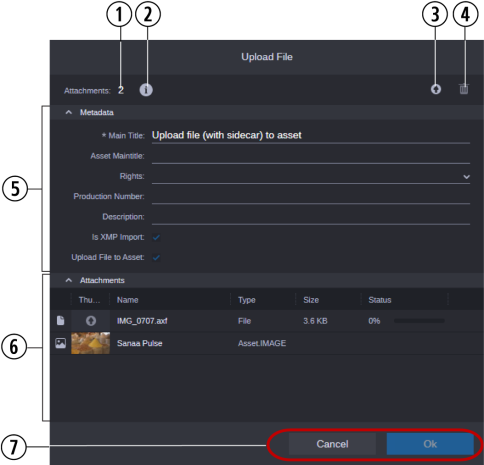
After selecting a process type from the Actions menu, the process creation form configured for the process opens. Although each process may show different details, all process creation dialog boxes share the same layout, as shown in the following example.
|
|
Control |
Description |
|
1 |
Attachments counter |
Shows the number of assets and files attached to the process. For more information, see Assets and Files as Process Attachments. |
|
2 |
Show Details button
|
Opens the Allowed Attachment Types window that provides information about the types and amount of assets that are allowed as attachments for the process. For more information, see Getting Information on Allowed Attachments. |
|
3 |
Upload button |
If a process is configured accordingly, you can upload files to the process during process creation. In this case, an Upload button is shown in the process creation dialog box and dropping files to the process creation dialog box is enabled. For more information, see Using File Attachments During Process Creation. |
|
4 |
Delete Attachment button |
Is only shown if the process is configured to allow deleting file attachments. You cannot delete the asset(s) originally attached to the process. |
|
5 |
Metadata area |
Displays process metadata. You can collapse and expand the area by clicking the Expand/Collapse icon to the left side of the Metadata header. The height of the area might vary depending on the number of properties and attachments. If the number of properties exceeds the maximum height of the area, a scroll bar is shown to the right side. If a property is editable, the value field is underlined and a text box, drop-down menu, or other input control is displayed. Read-only properties do not provide an input control. Mandatory fields are marked with an asterisk. As long as there is an empty mandatory field you cannot create the process. For more information, see Providing Process Metadata. |
|
6 |
Attachments area |
Displays assets and files attached to the process. You can collapse and expand the area by clicking the Expand/Collapse icon to the left side of the Attachments header. The height of the area might vary depending on the number of properties and attachments. If the number of attachments exceeds the maximum height of the area, a scroll bar is shown to the right side. For each attachment, an attachment card shows (from left to right) a type icon, a thumbnail or icon in the Thumbnail column, the name, type, size, and upload status. Attached files are shown first; below the files, attached assets are shown (without Size and Status information). You can resize the Name and Type columns by clicking the column divider and dragging it to the left or right. |
|
7 |
Buttons |
Let you create the process or cancel the process creation.
|
In some cases, the process creation dialog box will not show the Metadata and Attachments areas immediately but a “Preparing process” message, as shown in the following example.
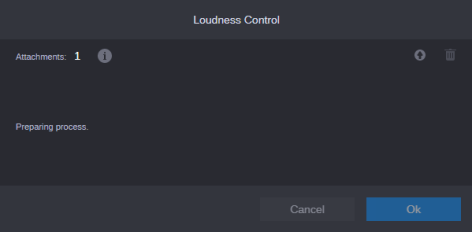
In those cases, the process performs some initial backend actions to prepare the display of all details. When the actions are finished, the Metadata and Attachments areas will be shown in the process creation dialog box.
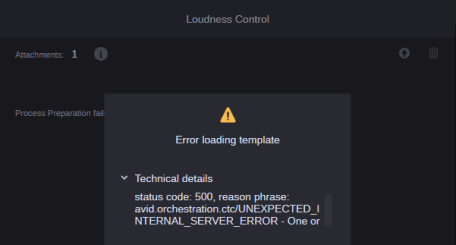
In case the process preparation fails, an error message is displayed, as shown in the following example. Click the "Technical details" link to show the technical error message.
Providing Process Metadata
In addition to text properties, Asset Management process creation forms can provide several other property types. Which properties are available and can be edited in a process creation dialog box depends on the configuration of the process template in Asset Management Datamodel Administrator.
You can annotate editable fields of Asset Management process in the process creation dialog box. “Annotation” here refers to the process of adding information to the process. Annotation related to an asset can be entered and edited in the Metadata tab. Basically, you have the same options for annotating process metadata as for annotating properties in the Metadata tab.
Unlike the Metadata tab, where saving changes might be required (depending on the configured save mode), in a process creation dialog box changes are automatically saved when you position the cursor outside the edited field (by clicking or pressing the Tab key) or you select a value from a legal list or thesaurus.
Mandatory fields are marked with an asterisk. When you delete the input from a mandatory field, the asterisk and the bottom line of the mandatory field are highlighted in red and a red exclamation mark is shown; when you hover the mouse over the exclamation mark, a “This field is required” pop-up message appears. As long as there is an empty mandatory field you cannot create the process: When you click the OK button, the area scrolls to the empty mandatory property; if the Metadata area was collapsed, it is expanded to show the properties.
For more information on how to edit the individual property types, see the corresponding Metadata tab topics:
Assets and Files as Process Attachments
Depending on the process configuration, you can attach assets or files or both to processes and user tasks. Note the following differences between asset and file attachments:
-
Assets: Assets are registered, saved, and searchable in the Asset Management and MediaCentral Cloud UX databases. You can attach assets during process creation or in the context of a user task.
-
During process creation you can see the attached assets but cannot add assets or delete attached assets in the process creation dialog box.
-
In context of a user task you can apply actions, reuse assets in other MediaCentral Cloud UX apps, and remove them from the task. You cannot download assets. See Adding and Editing User Task Attachments and Deleting Attachments.
In the process creation dialog box, for each attached asset an asset type icon, a header frame or placeholder icon, the asset name, and asset type are shown.
-
-
Files: Files only “exist” in the context of a process. You can upload files to a process or a task, but they are not searchable and cannot be reused in other MediaCentral Cloud UX apps. You can delete file attachments from the process creation dialog box and the Tasks app.You can download file attachments only from the Tasks app. See Downloading File Attachments.
In the process creation dialog box, for each attached file a File type icon, an Upload thumbnail, Name, Type, Size, and Status are shown. A Delete button and (only in the Tasks app) a Download button might be shown.
For more information, see Using File Attachments During Process Creation and Getting Information on Allowed Attachments.
Using File Attachments During Process Creation
When you create a process in the Browse or Search app, you attach at least one asset to it. When you create a process in the Tasks app, the process has no attachment. In each app, if a process is configured accordingly, you can upload files to the process during process creation. In this case, an Upload button is shown in the process dialog box and dropping files to the process dialog box is enabled. Which and how many files can be uploaded depends on the configuration of the process in MediaCentral Asset Management and MediaCentral Cloud UX Process Modeler.
Note the following:
-
When you use file attachments for a process, you can finish process creation only if all file attachments are completely uploaded. If this requirement is not fulfilled, the process dialog box’s OK button is disabled.
-
While you add files to the process creation dialog box, the configured allowed attachment maximum is evaluated. If the limit is exceed, a message informs you about the allowed maximum, as shown in the following example. After closing the message by clicking OK, adding files to the process is canceled and no files are attached.

-
You can delete files from the process creation dialog, which are in Waiting status, while they are being uploaded, or after they have been uploaded; deleting a file in Waiting status or that is being uploaded first cancels the upload and then removes the file. Note that you cannot remove any asset attached to the process.
To upload files:
-
Create a process to open a process dialog box.
The Details area shows the number of attached items in the header area, and each attached asset as an “asset card” in the assets area.
-
Do one of the following:
-
Click the Upload button in the process creation dialog box, then select the files to be uploaded in the Open dialog box.
-
Open the Explorer (Windows) or Finder (macOS), select one or several files and drag them to the process creation dialog box.
If dropping is possible, the drop area is highlighted with a blue frame, as shown in the following illustration.
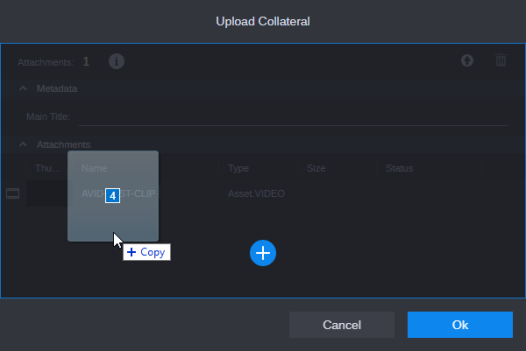
The files are added to the Attachments area. The Attachments counter in the dialog box header is adapted accordingly. If the Attachments area was collapsed before dropping the files, the area is expanded; the view inside the dialog box scrolls to the last added file. If the amount of uploaded files do not fit into the available space of the expanded Attachments area, the view scrolls to the top of the uploaded files range.
For each file, an attachment card shows (from left to right) a File type icon, an Upload icon in the Thumbnail column, the file name, type “File”, file size, and upload status. Below the files, the originally attached assets are shown (without Size and Status information).
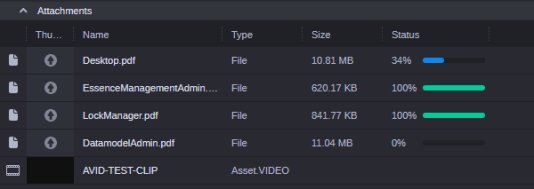
The status of a files can be one of the following:
-
Waiting: An empty status bar and 0% are shown as long as the upload has not been started.
-
In Progress: A blue progress bar and percentage data are shown during the upload.
-
Completed: A green progress bar and 100% are shown for successfully uploaded files.
-
Upload failed: A red progress bar and 100% are shown for failed uploads.
A tooltip over the Status progress bar also shows the percentage data.
If the same files were already uploaded or are in status Waiting or In Progress, a “Overwrite file” prompt opens.

Do one of the following:
-
Cancel: Closes the prompt without any action.
-
No: Skips already uploaded file(s) but adds new ones.
-
Yes: Closes the prompt and overwrites already uploaded file(s).
-
-
Click OK to create the process with the provided metadata and files attached.
If at least one attached file is in status “Upload failed,” a “Some files failed to load” security prompt opens. Click OK to create the process without them; if you click Cancel, process creation is not started.
To delete file attachments:
-
Do one of the following:
-
To delete a single file attachment, hover the mouse pointer over an attachment card and click the Delete button that is shown on the right side of the attachment card.

-
Select several files in the Attachments area by using Ctrl/Shift+click and click the Delete Attachment button in the header area of the process dialog box.

-
Select one or several files and press the Del or Backspace key.
-
Select one or several files, right-click the selection and select Delete.
A Delete Attachments security prompt opens.
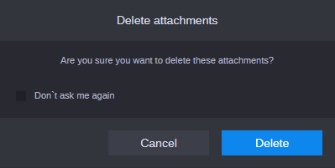
If you select the Don’t ask me again check box, you disable the security prompt. To enable the security prompt again, press the Ctrl key when applying a deletion command.
-
-
Click Delete to delete the file attachment(s).
The Attachments counter in the dialog box header is adapted accordingly.
If you click Cancel, press the Esc key or click outside the security prompt, the selected files are not deleted.
If the deletion of at least one file is not successful, a “Failed to delete” message opens that lets you to decide how to continue: Click Yes to remove the file(s) from the attachments area anyway, click No to leave the file(s) listed in the Attachments area.
Getting Information on Allowed Attachments
When you create a process, the Create Process dialog box shows the number of attachments in the Attachments count. The same information is provided in the Tasks app when you select a task. See Working with the Tasks App (Asset Management).
An Allowed Attachment Types window provides information about the types and amount of assets that are allowed as attachments for the process. Note that the rules shown in the window only refer to assets but not to file attachments. Only the Total field includes information about file attachments.
To get information on the allowed attachments:
-
Open the Create Process dialog box.
The Attachments count shows the number of attached items and the attached items are shown as attachment cards in the Attachments area.
-
Click the Show Details icon beside the Attachments count.
The Allowed Attachment Types window opens.
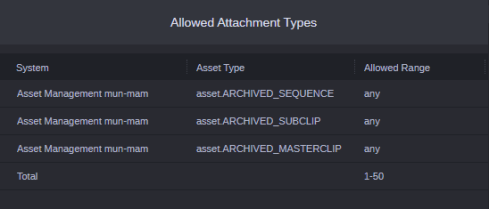
The Allowed Attachment Types window provides detailed information on the number and type of allowed assets. Each row represents a rule.
-
System: Type (Asset Management, Production Management, Newsroom Management, Container Management) and name of the system to which the rule applies. If the rule applies to all systems of a type, the prefix “Any” is shown.
-
Asset Types: Name of the allowed asset type or “any” if there is no restriction.
-
Allowed Range: Number and range of allowed attachments (none, any, exactly n, up to n, from n-to m).
-
Total: The maximum number of attachments allowed for the process. This includes assets and files uploaded to the process.
-
-
Click anywhere outside the window to close the Allowed Attachment Types window.